The prefered way to install the drivers for the smart card reader and the smart card on MS Windows is through automatic installer for Infonotary. The automatic installer defines what to install depending on:
- devices you have
- the version of the operating system
Before you begin
- In order to work the automatic installer requires an Internet connection
- The process of the installation may take different amount of time, depending off your Internet connection
Using InfoNotary PNP Installer
If Infontary PNP Installer is already installed you may start it from Start menu > All Programs > InfoNotary > InfoNotary Software Installation. In case it is not installed, you can download it from HERE.
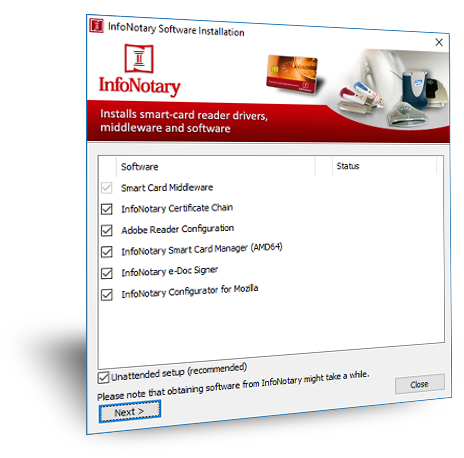
| Software | |
|---|---|
| InfoNotary Smart Card Manager for Microsoft Windows 8*, 10, 11 |
Download |
| InfoNotary e-Doc Signer for Microsoft Windows 8*, 10, 11 |
Download |
| *Out of Microsoft support. There are possible difficulties of installation or usage of the software. | |
Instructions for signing documents with qualified electronic signature in InfoNotary e-Doc Signer
- The instruction was made using a version of InfoNotary e-Doc Signer NG 2.0.6.1164
About
InfoNotary e-Doc Signer is a program for signing and verification of digital documents in CAdES format. The format meets the requirements of a European standard, replacing the previously used CMS / PKCS7 format
File extensions
InfoNotary e-Doc Signer adds the following extensions corresponding to the operations performed:
- .p7m - extension for attached signature, generic signature and long-term signature
- .p7s - extension for detached signature and detached long-term signature
- .tsr - extension for timestamp validation
Signing of file
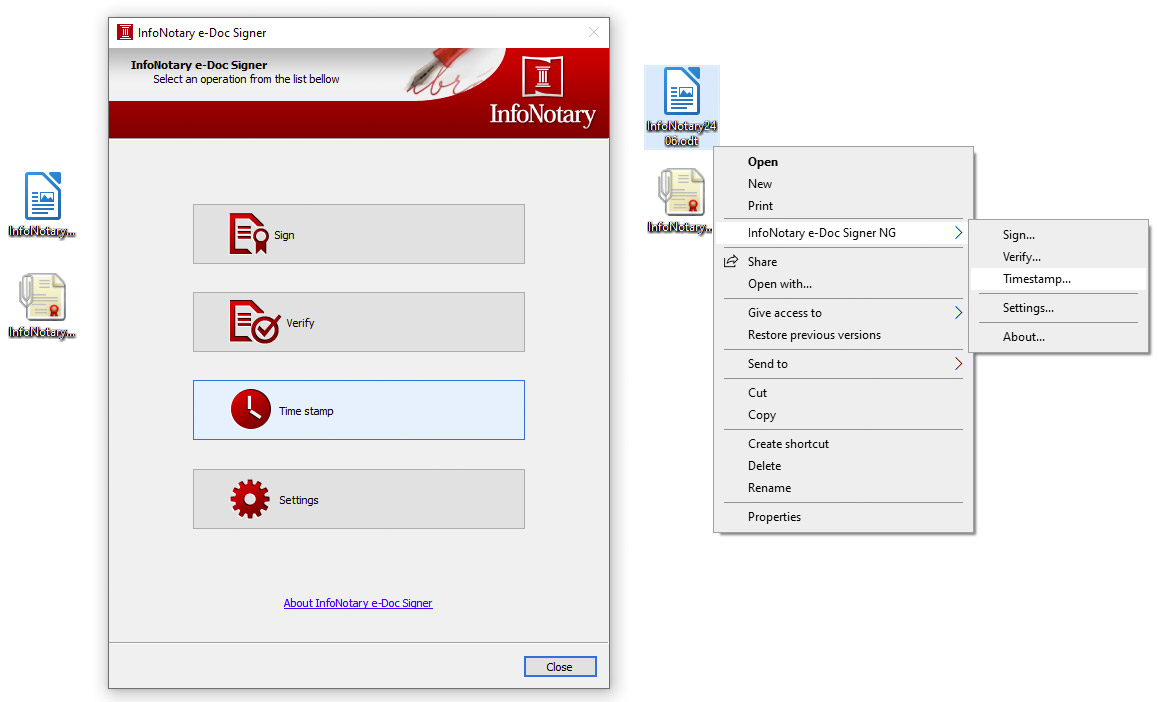
1. Start the software or right-click on the file then select InfoNotary e-Doc Signer NG > Sign.
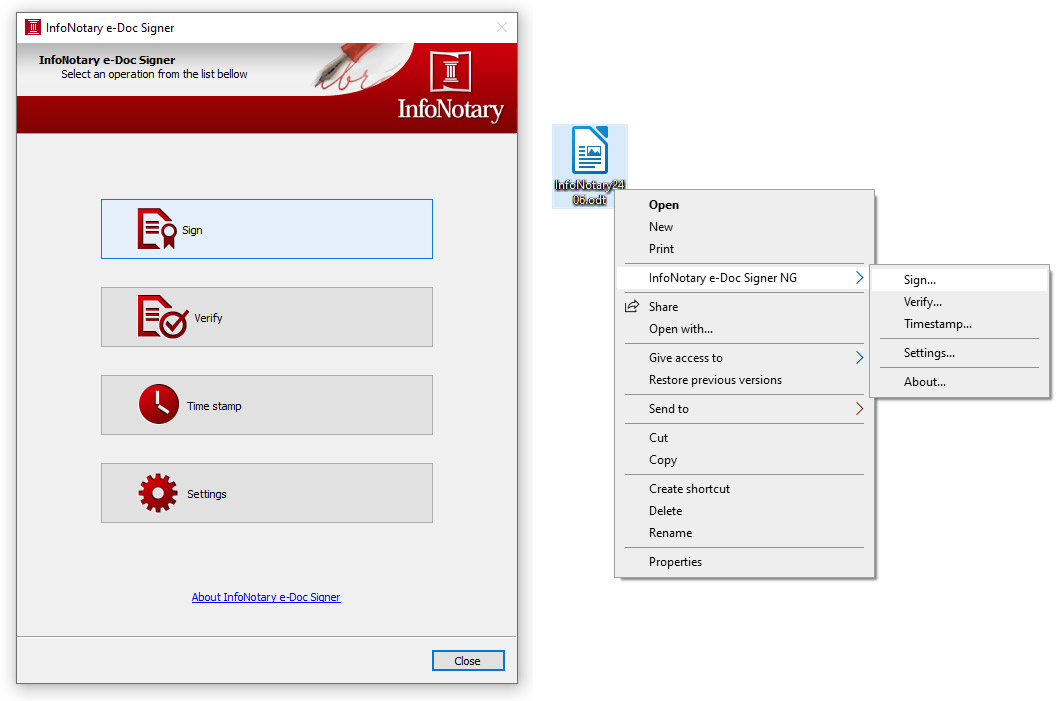
2. Choose Signing scheme.
- Attached Signature - add file extension .p7m
- Detached Signature - add file extension .p7s.
- Generic Signature - add file extension .p7m, it contains timestamp from the timestamp server of InfoNotary, which proves the existing of the signature at the time of signing.
- Long-term Signature - add file extension .p7m, it contains timestamp from the timestamp server of InfoNotary, which proves the signature and the protected content of the document existing at the time of signing.
- Detached long-term Signature - add file extension .p7s,it contains timestamp from the timestamp server of InfoNotary, which proves the signature and the protected content of the document existing at the time of signing.
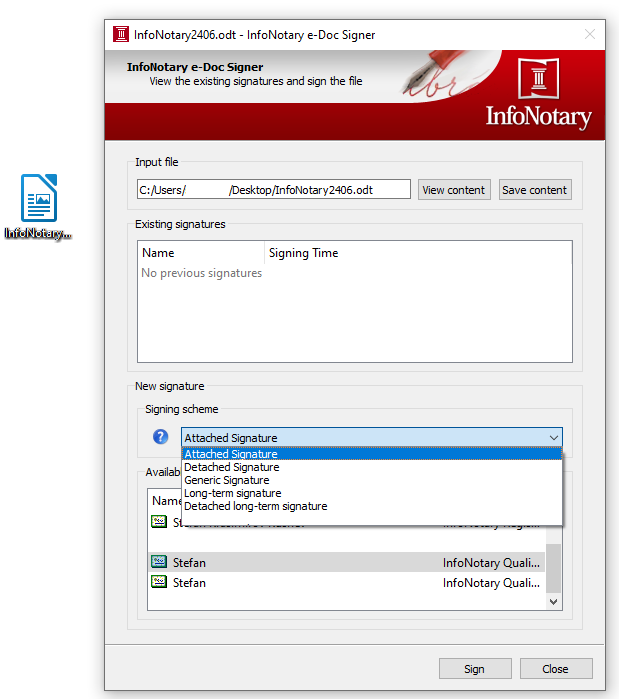
3. Choose available certificate from the list. Click Sign and dial your PIN code.

4. The software creates a file in the directory with extension that corresponding to the signing scheme that you've chosen.
Verifying a signed file
1. Start the software or right-click on the file then select InfoNotary e-Doc Signer NG > Verify.
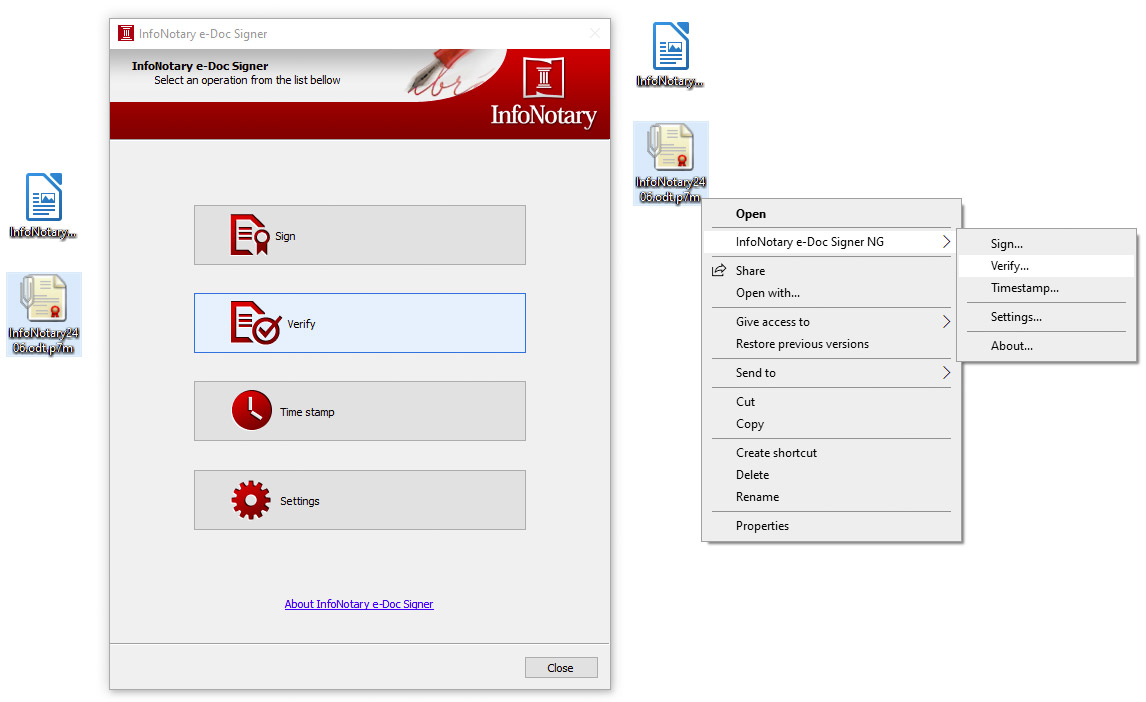
2. Double click on the added signature, to see more details.
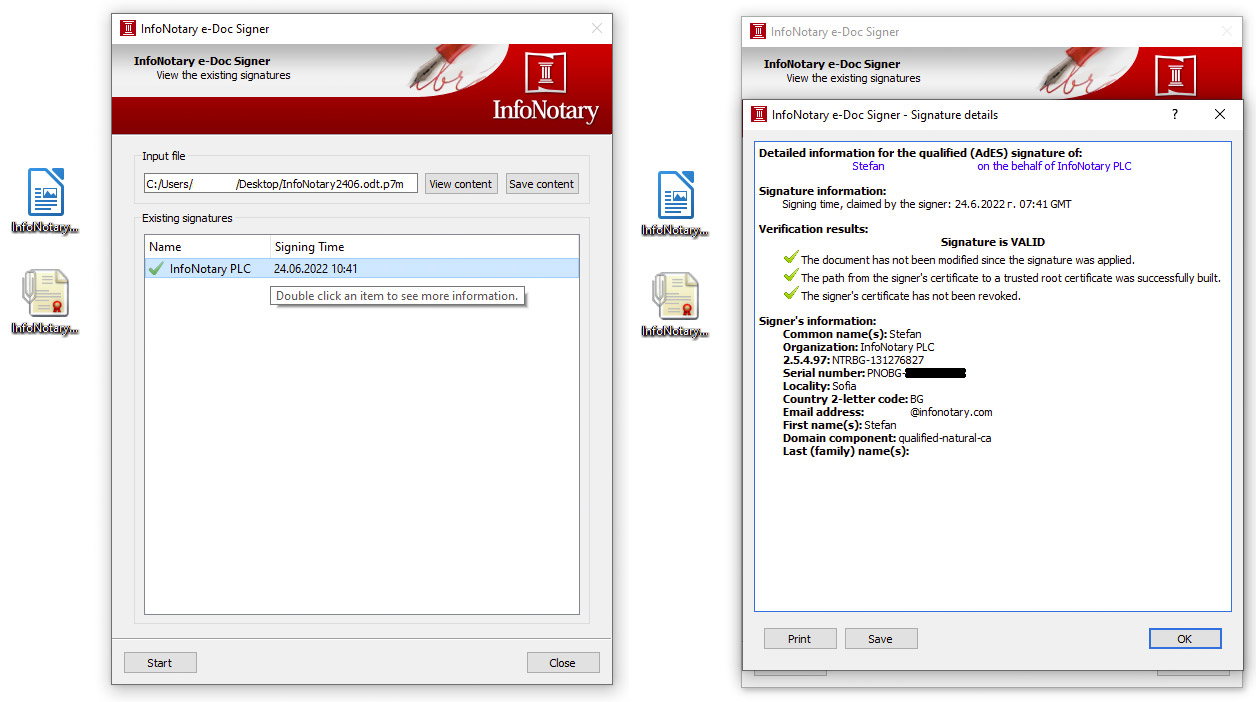
- For verification you can also use InfoNotary qualified validation service
Timestamping
The software uses the timestamp server of InfoNotary
1. Start the software or right-click on the file then select InfoNotary e-Doc Signer NG > TimeStamp.
2. The action creates timestamp signing from independent server (not from your local computer), and create file in the directory with extension .tsr.
Before you begin
- If you have smart card reader and smart card from Infonotary, but you didn't install the drivers for them do the following Installation of smart card reader and smart card drivers in Windows
Set your user profile in Microsoft Outlook
In order that you sign your e-mails you must associate your user profile (account) with your digital signature, on the smart card. This can be done this way:
- For version Microsoft Outlook 2013/2016
Start Microsoft Outlook.
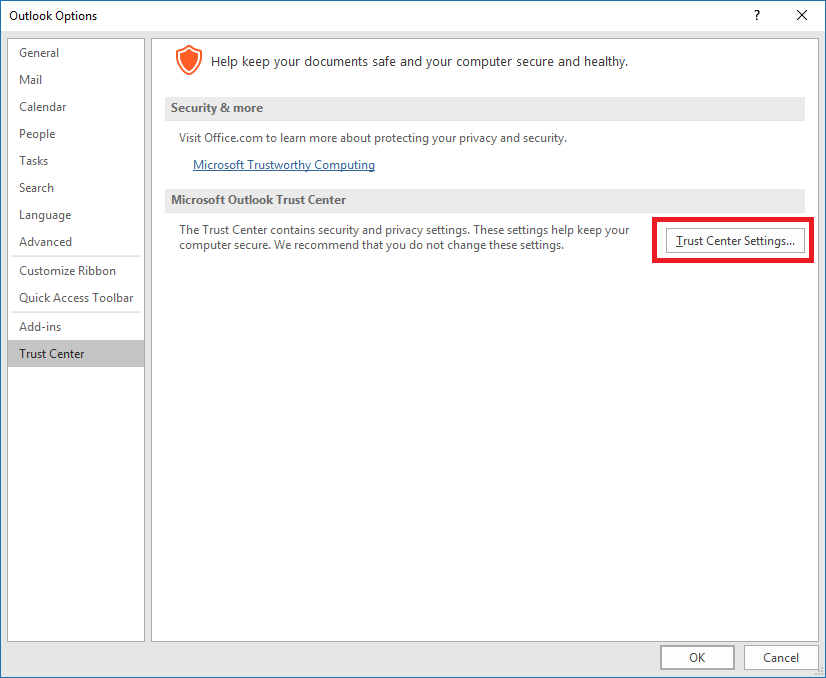
Choose File.
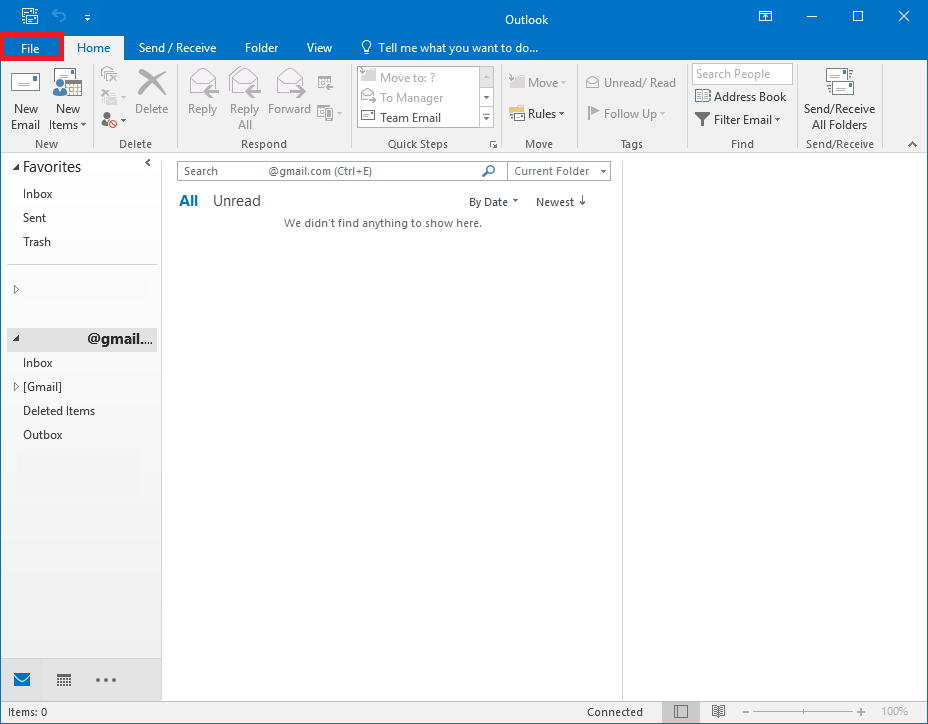
From the menu, choose Options.
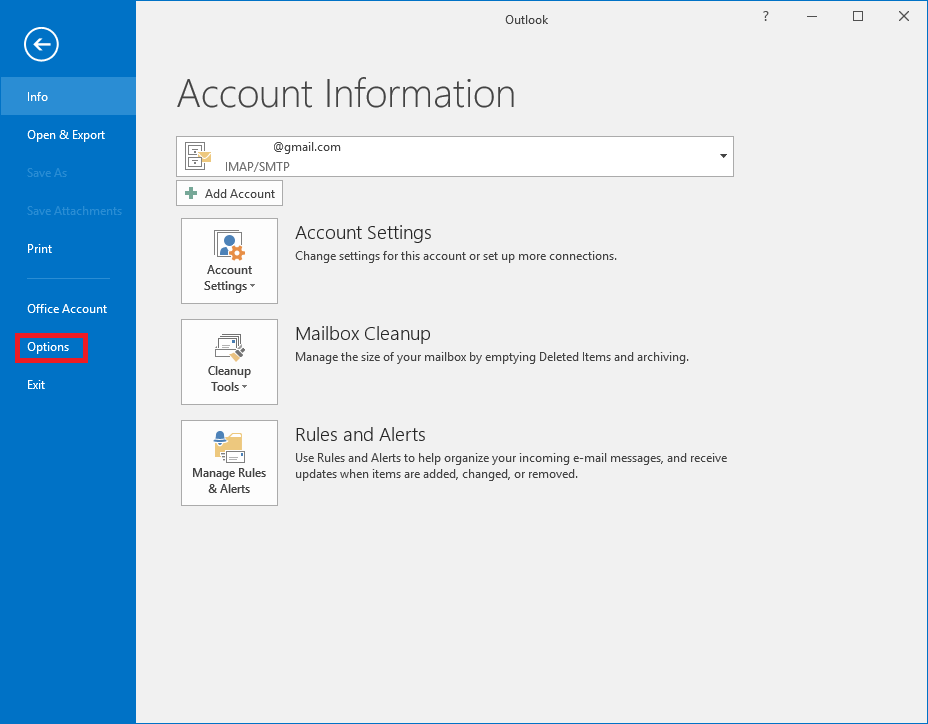
From Trust Center, click on Trust Center Settings.
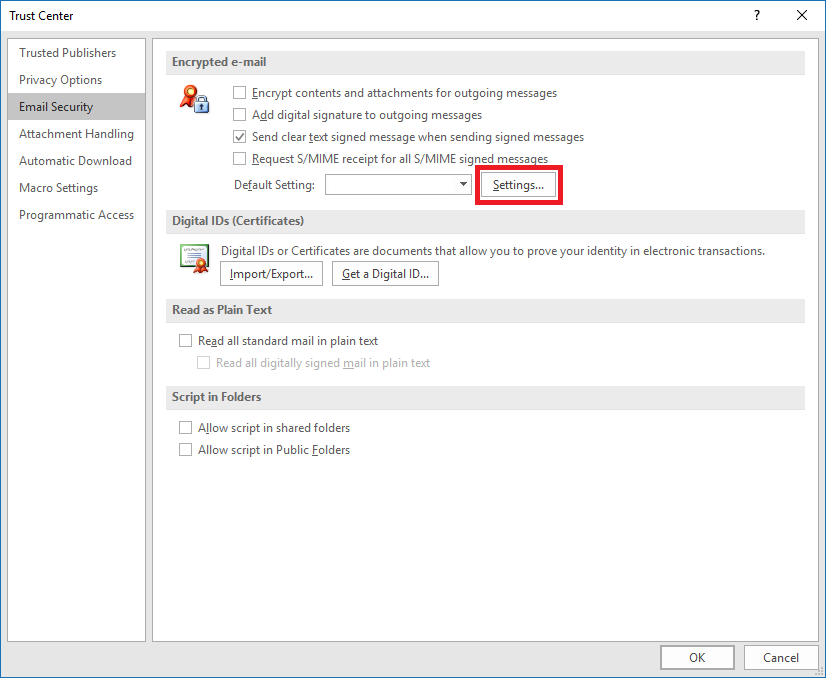
Choose Email Security and click Settings.
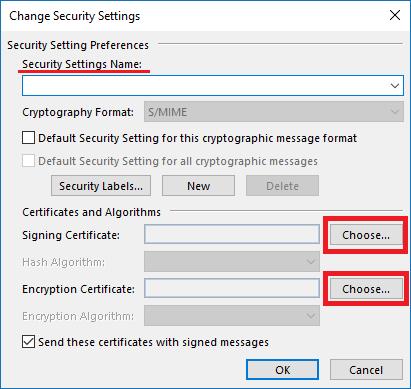
Type your e-mail in the field Security Settings Name
Choose your certificate, then for Hash Algorithm select SHA 256 and confirm with OK.
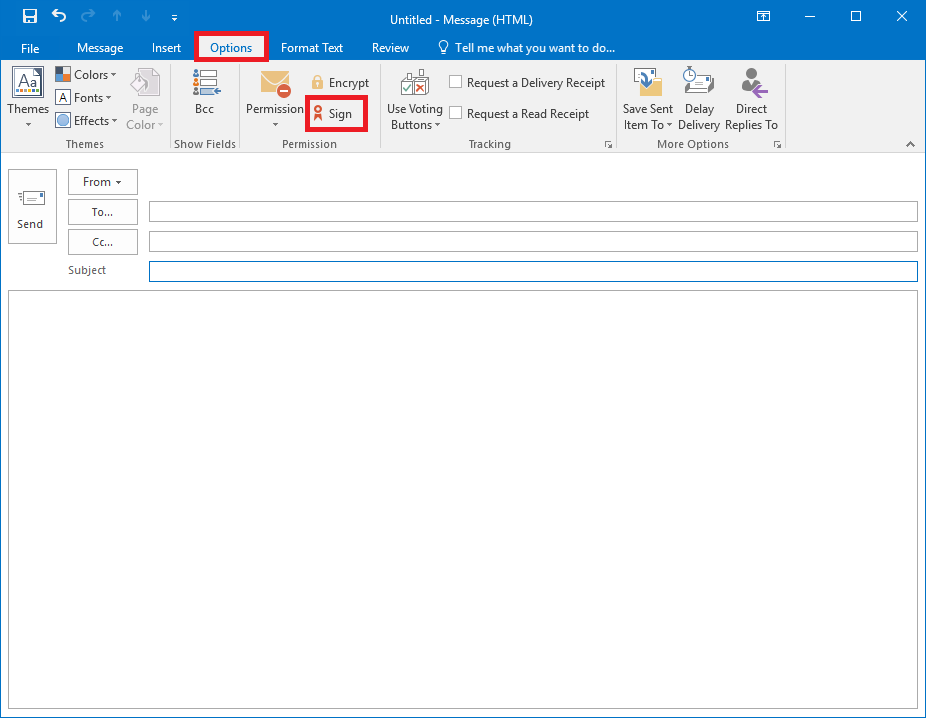
To sign a message, choose Options and click on Sign.
Every time when you send signed e-mails you must insert your smart card. When you send you will be prompted for PIN.
Before you proceed you must do
- If you have smart card reader and smart card from InfoNotary, but you didn't install the drivers for them do the following Installation of smart card reader and smart card drivers in Windows
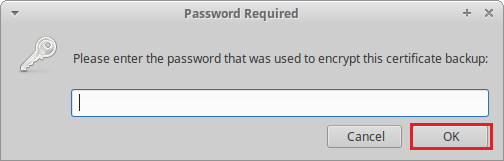
- IMPORTANT : In the information message "Please enter the master password for InfoNotary", enter your PIN code.
- IMPORTANT : Firefox and Thunderbird use direct access to the smart card. When you have successfully installed your certificates, you SHOULD NOT delete them from there, as this will also delete the certificate, along with the private and public keys on the smart card. After that, the certificate cannot be restored and a new one must be issued.
- In order to use your certificate with Firefox and Thunderbird, the reader must be on your computer before opening the program.
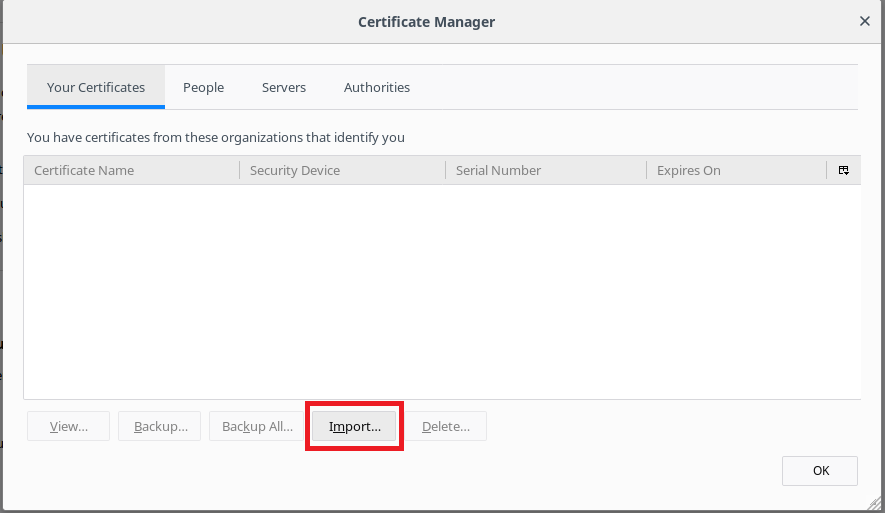
Install InfoNotary certificate chain
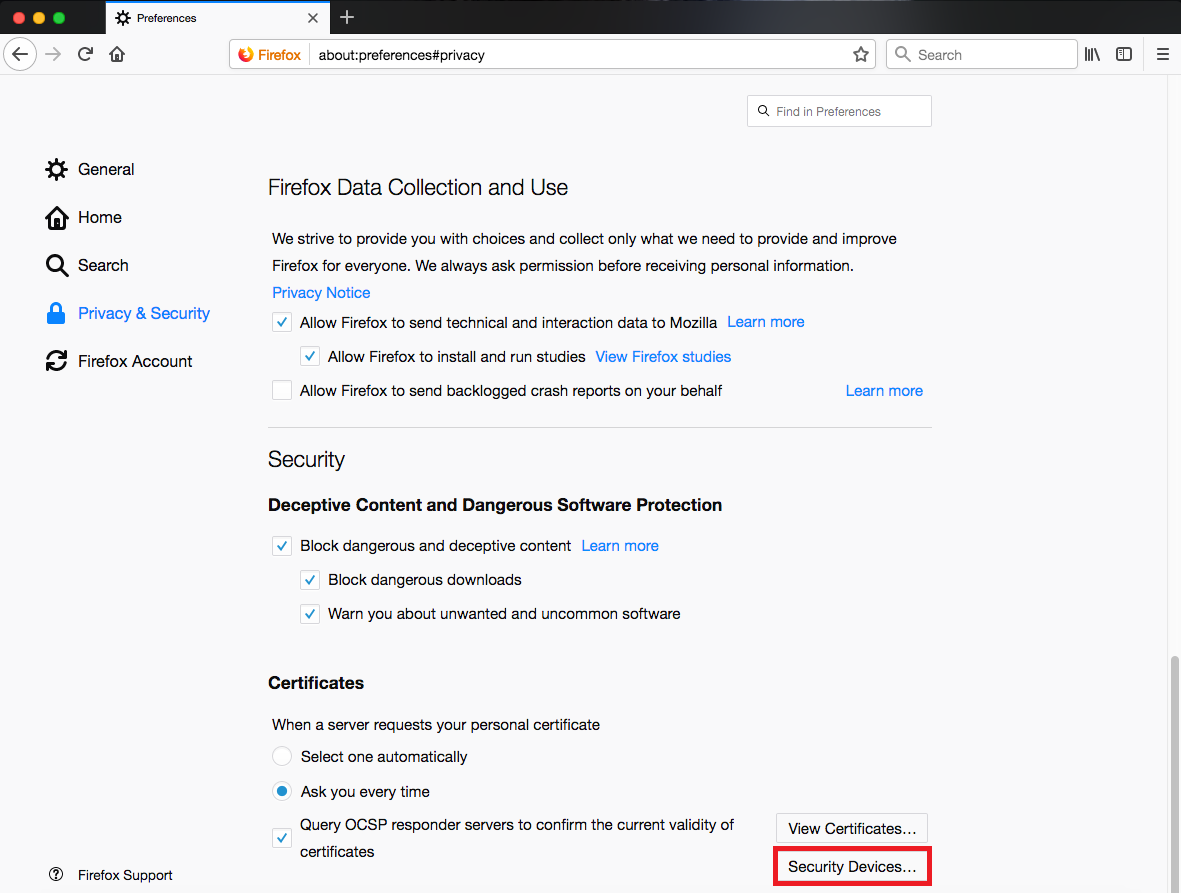
Start Mozilla Firefox. From the menu, choose Options.
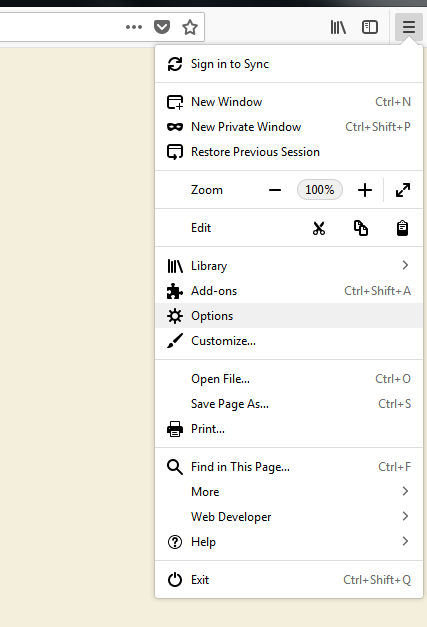
From Privacy & Security, choose View Certificates.

Choose the tab Your certificates and click on Import.
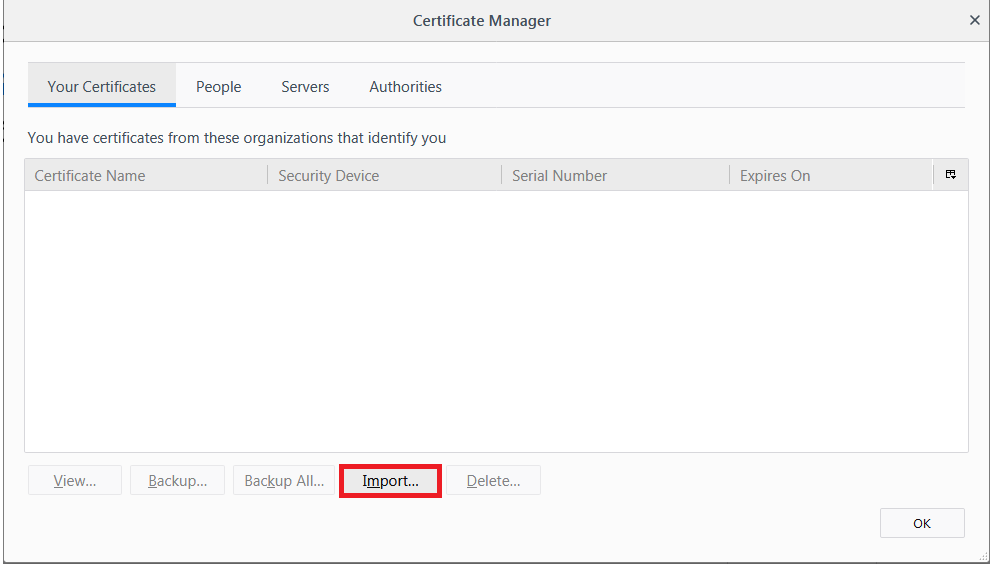
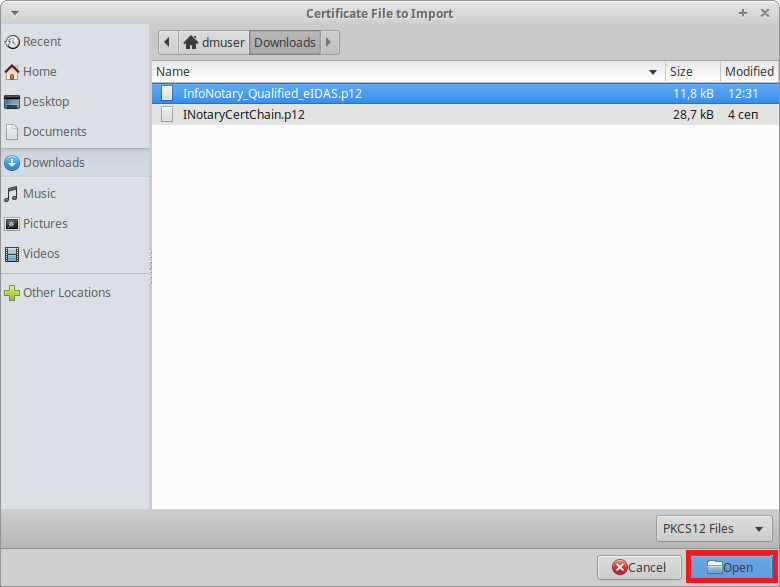
Specify the path to certification chain - InfoNotary_Qualified_eIDAS.p12
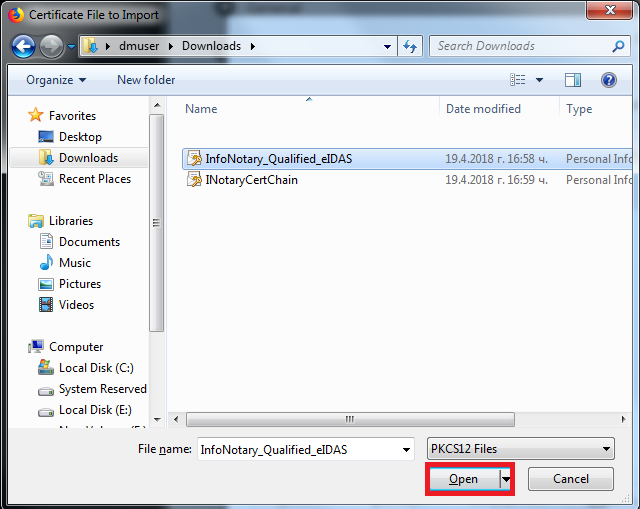
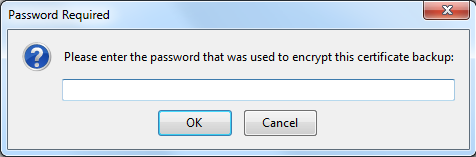
Leave the field blank and click OK.
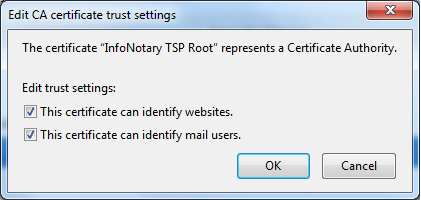
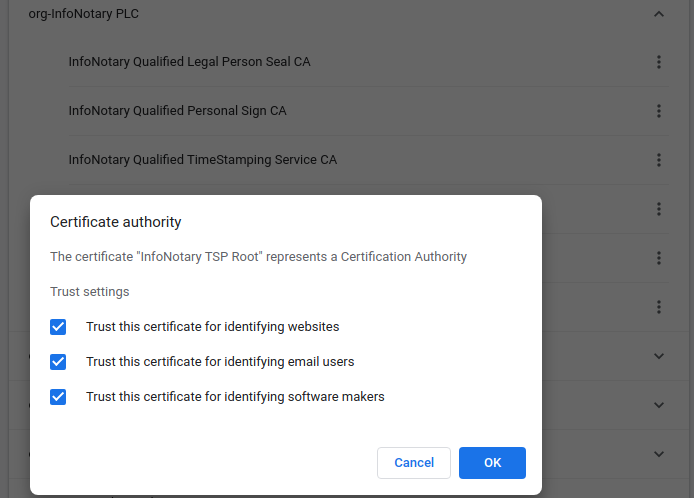
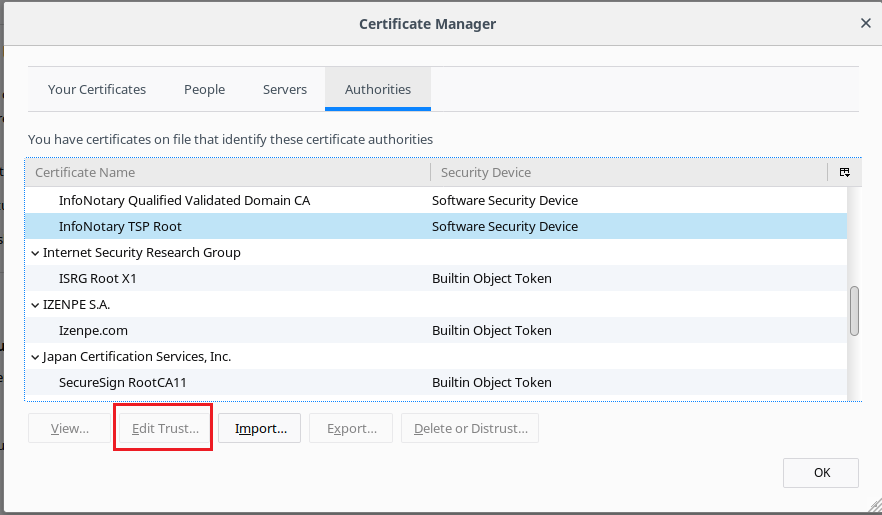
Newly installed certificates can be found in section Authorities.
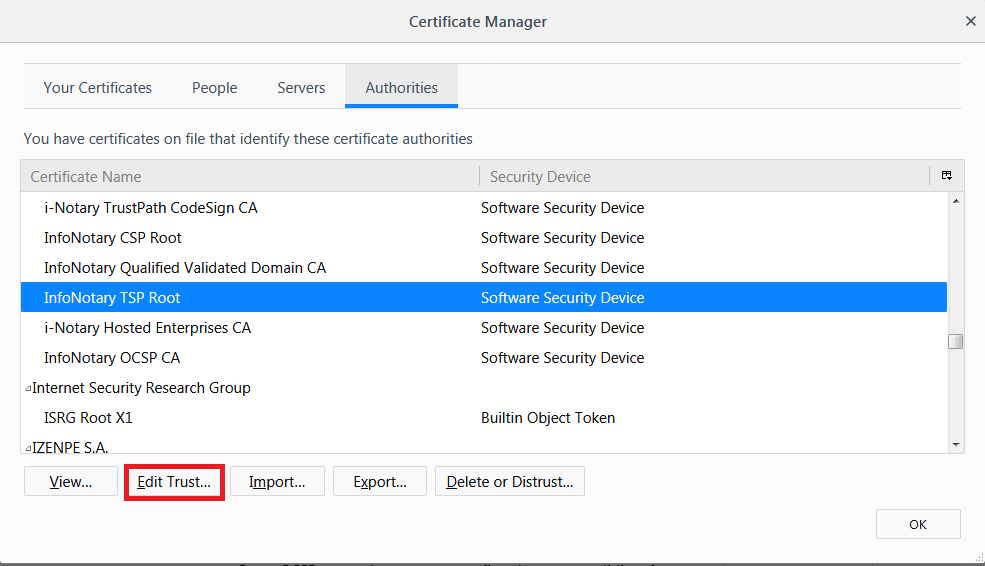
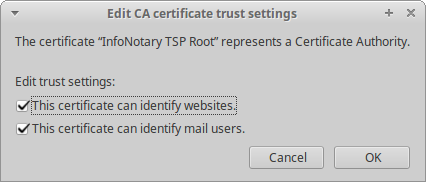
In Mozilla for every certificate of a Certification Authority (CA) the user must choose a level of trust. This is done by selecting the certificate and clicking on Edit Trust. The easiest way to do this setting for the certificate "InfoNotary TSP Root" is to select the two possible options. This will make all the InfoNotary trusted certificates for all operations.
Install software security module
In order to use you digital certificate with Mozilla based applications like Firefox, Thunderbird etc., you must register PKCS#11 module, for your smart card. It is nessesary to install the drivers for the smart card before that.
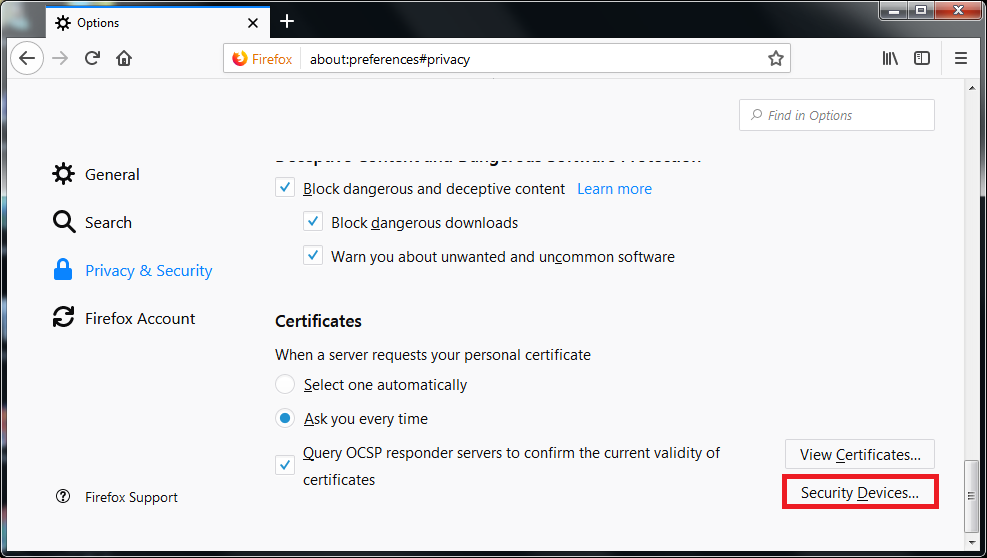
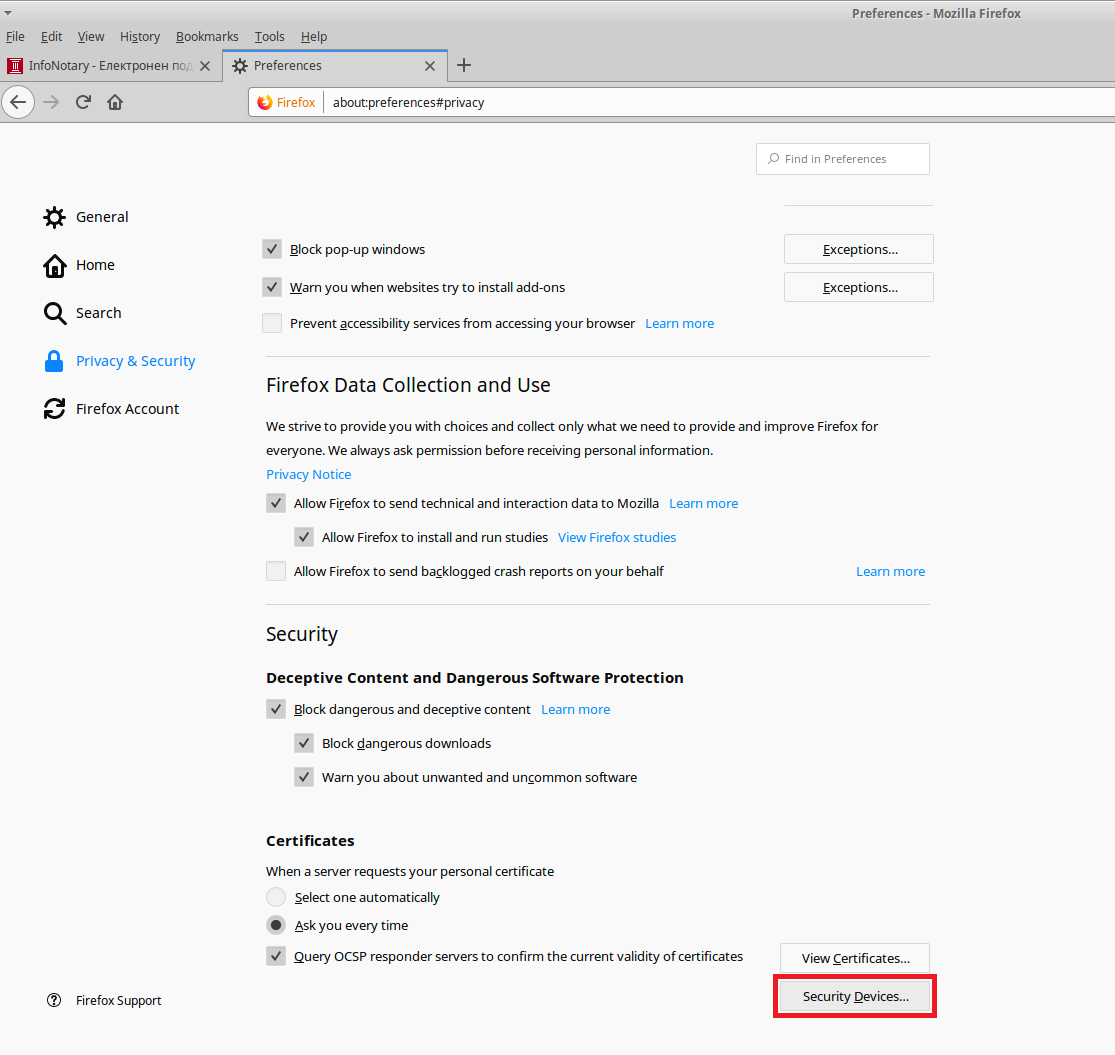
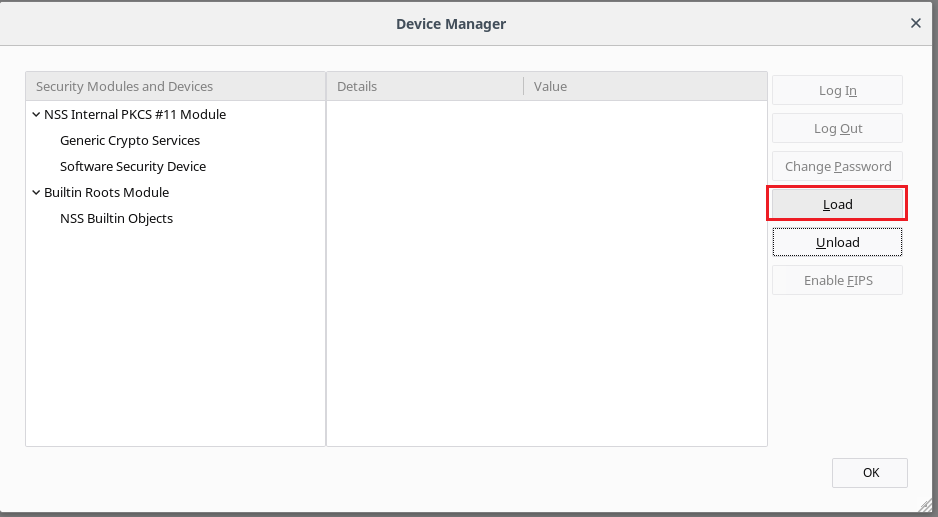
Start Firefox Quantum. From the menu, choose Options.
From Privacy & Security, choose Security Devices.
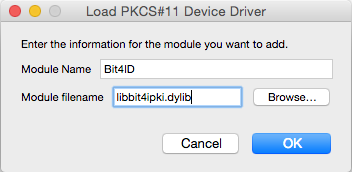
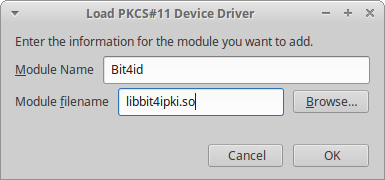
To add a new device, choose Load.
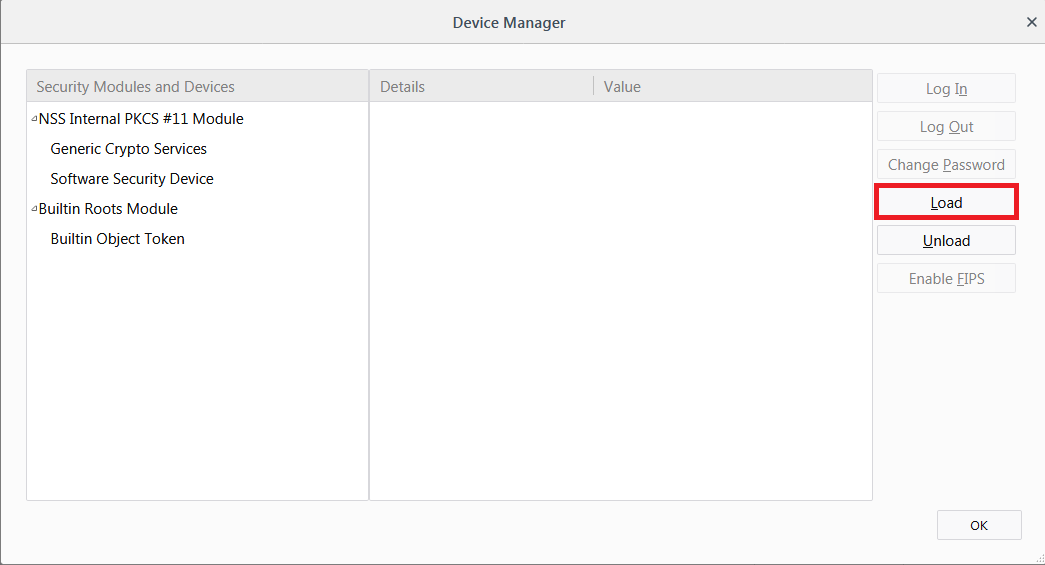
Change the name of the module (Module Name), as desired.
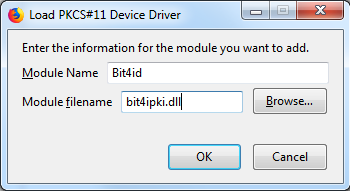
Select PKCS # 11 library corresponding to your smart card.
- IDPrime - C:\WINDOWS\system32\eTPKCS11.dll
- Siemens - C:\WINDOWS\system32\siecap11.dll
- Charismathics - C:\WINDOWS\system32\cmP11.dll
- Bit4id - C:\WINDOWS\system32\bit4ipki.dll
In case you use 64 bits version of Firefox or Thunderbird and Charismathics smart card, path to library is C:\WINDOWS\system32\cmP1164.dll.
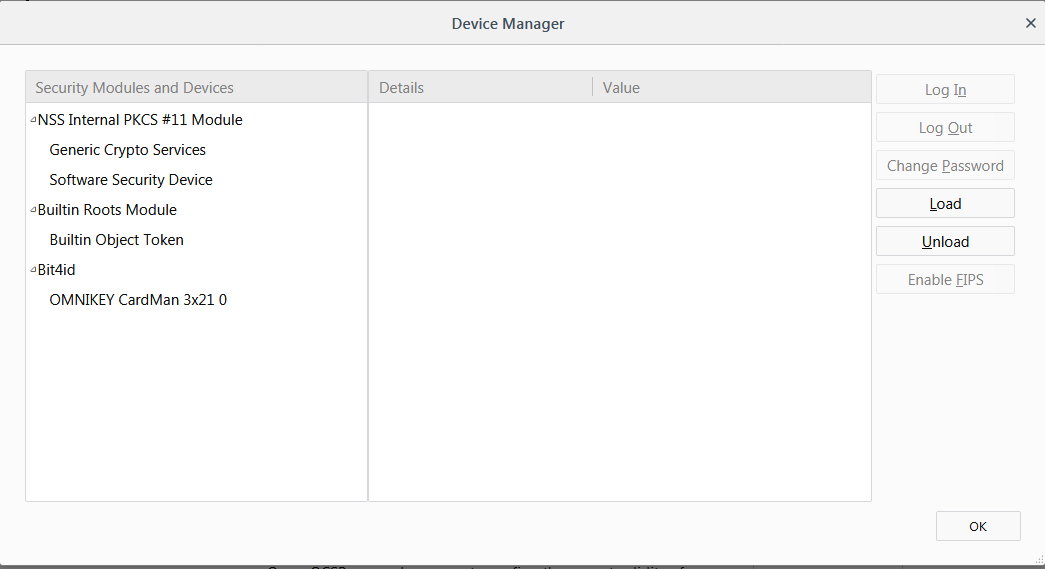
After you click OK, your smart card will appear in the list of available devices.
Before you proceed you must do
- If you have smart card reader and smart card from InfoNotary, but you didn't install the drivers for them do the following nstallation of smart card reader and smart card drivers in Windows
- IMPORTANT: In the information message "Please enter the master password for InfoNotary", enter your PIN code
- IMPORTANT: Firefox and Thunderbird use direct access to the smart card. When you have successfully installed your certificates, you SHOULD NOT delete them from there, as this will also delete the certificate, along with the private and public keys on the smart card. After that, the certificate cannot be restored and a new one must be issued.
- IMPORTANT: In order to use your certificate with Firefox and Thunderbird, the reader must be on your computer before opening the program.
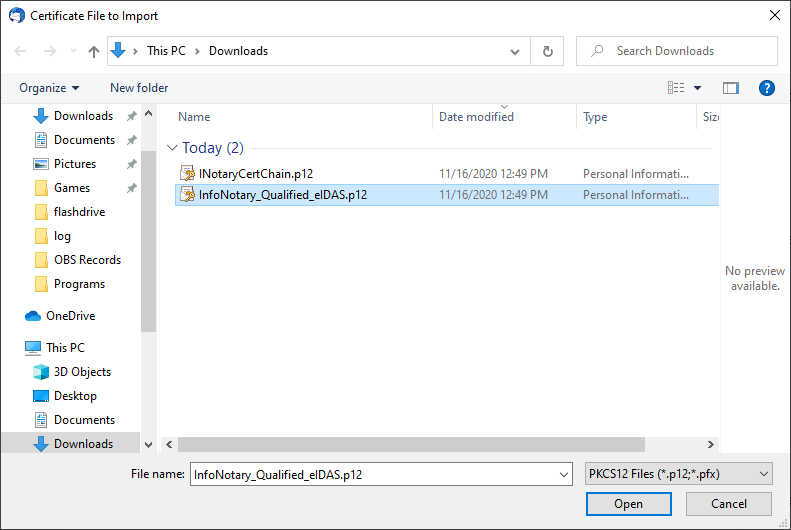
Install Infonotary certificate chain
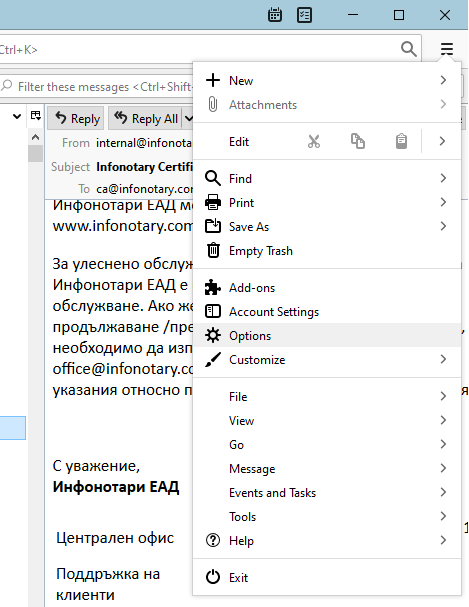
Start Mozilla Thunderbird. From the menu, select Options.
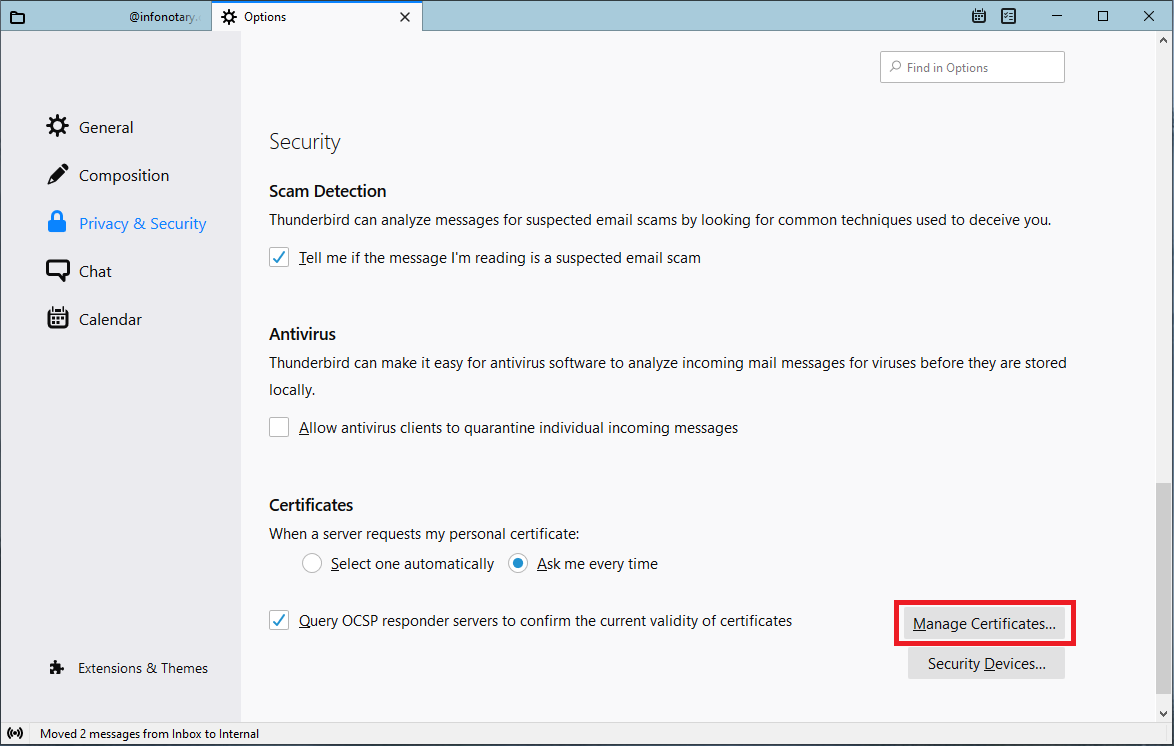
From Privacy & Security select Manage Certificates.
Choose the tab Your certificates and click on Import.

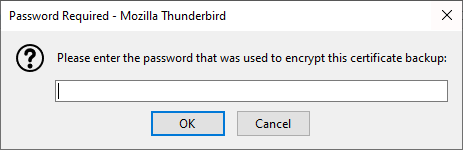
From the window that appears, select the pre-downloaded certification chain - InfoNotary_Qualified_eIDAS.p12
Leave the field blank and click OK.
Newly installed certificates can be found in section Authorities.
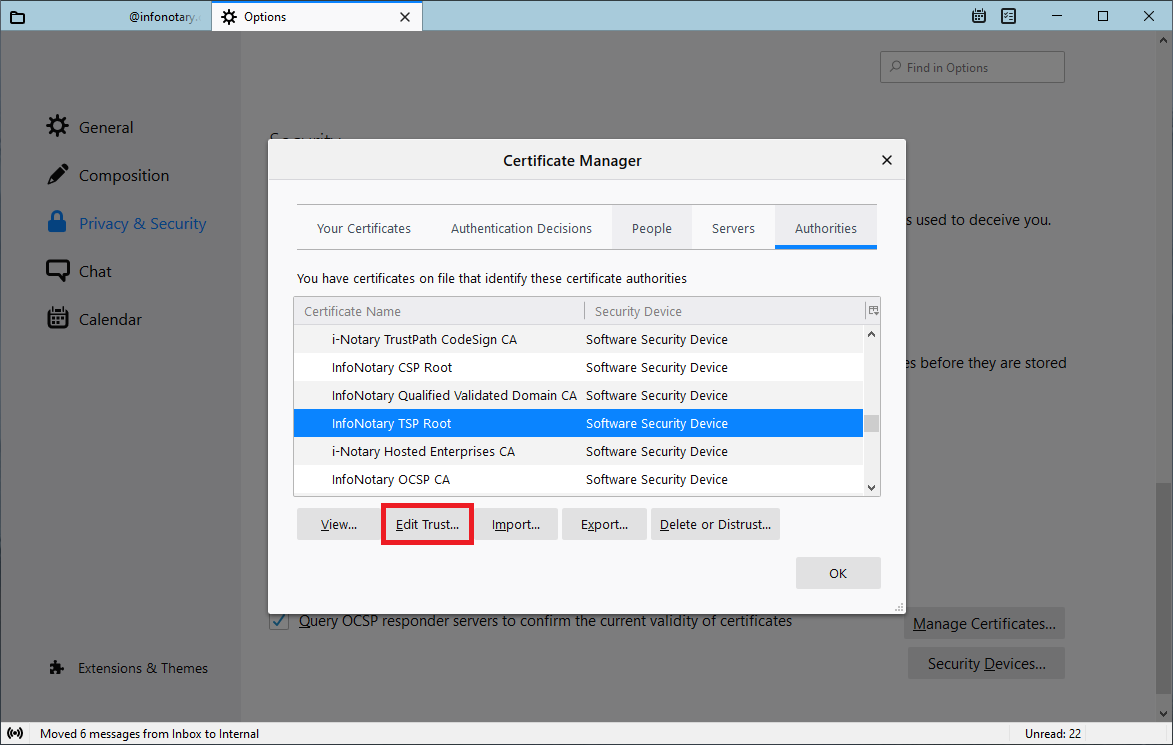
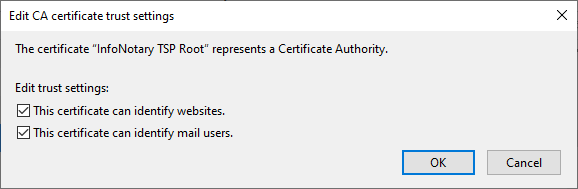
In Mozilla for every certificate of a Certification Authority (CA) the user must choose a level of trust. This is done by selecting the certificate and clicking on Edit Trust. The easiest way to do this setting for the certificate "InfoNotary TSP Root" select two possible options. This will make all the InfoNotary trusted certificates for all operations.
Install software security module
Start Mozilla Thunderbird. From the menu, select Options.
From Privacy & Security, choose Security Devices.
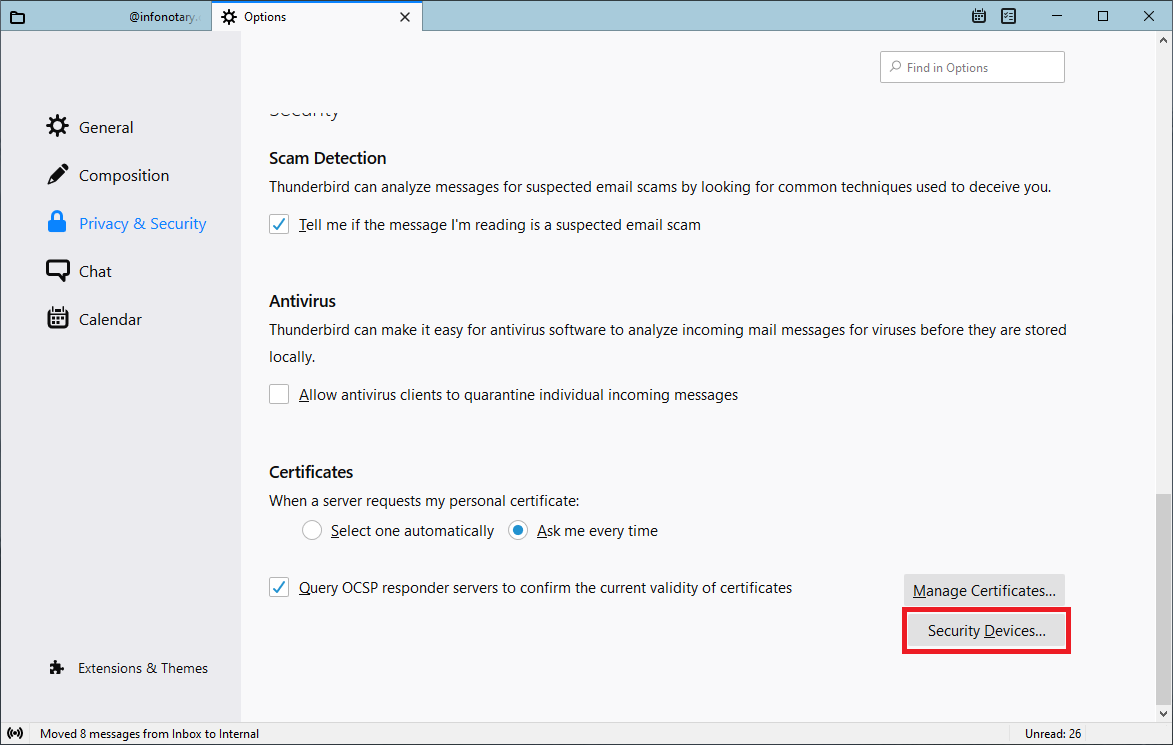
To add a new device, choose Load.
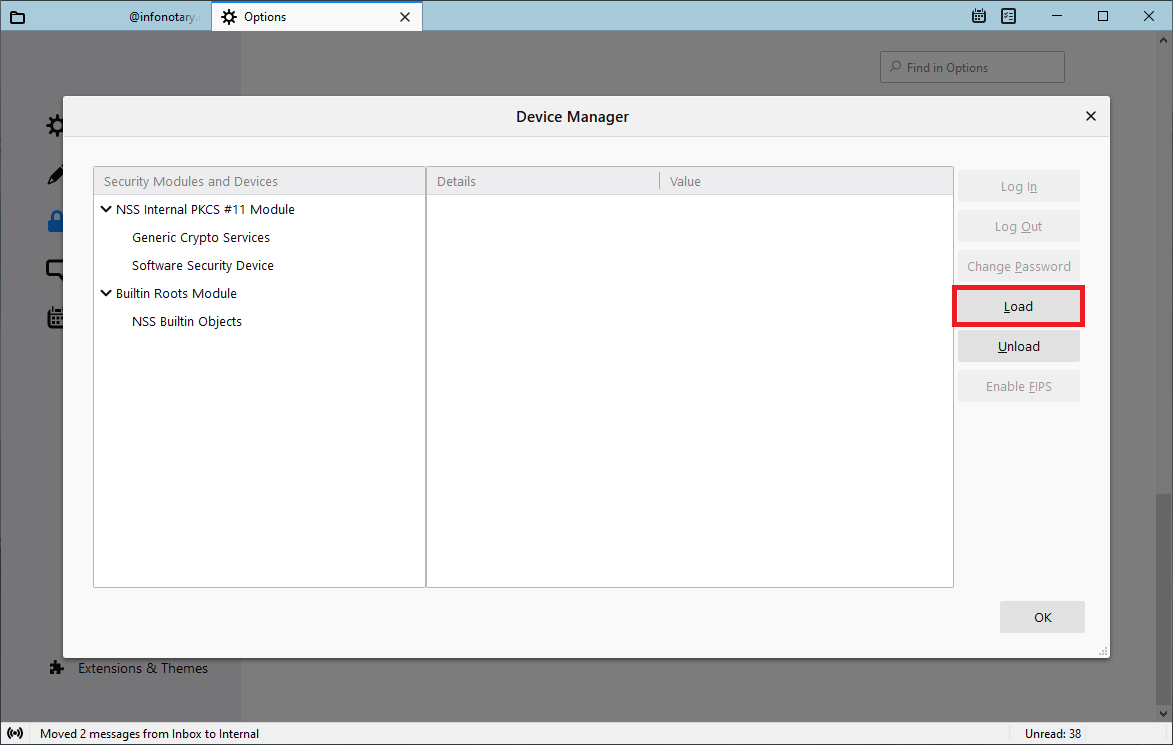
Change the name of the module (Module Name), as desired.
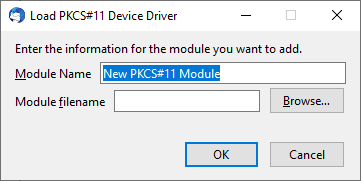
Select PKCS # 11 library corresponding to your smart card.
- IDPrime - C:\WINDOWS\system32\eTPKCS11.dll
- Siemens - C:\WINDOWS\system32\siecap11.dll
- Charismathics - C:\WINDOWS\system32\cmP11.dll
- Bit4id - C:\WINDOWS\system32\bit4ipki.dll
In case you use 64 bits version of Firefox or Thunderbird and Charismathics smart card, path to library is C:\WINDOWS\system32\cmP1164.dll.
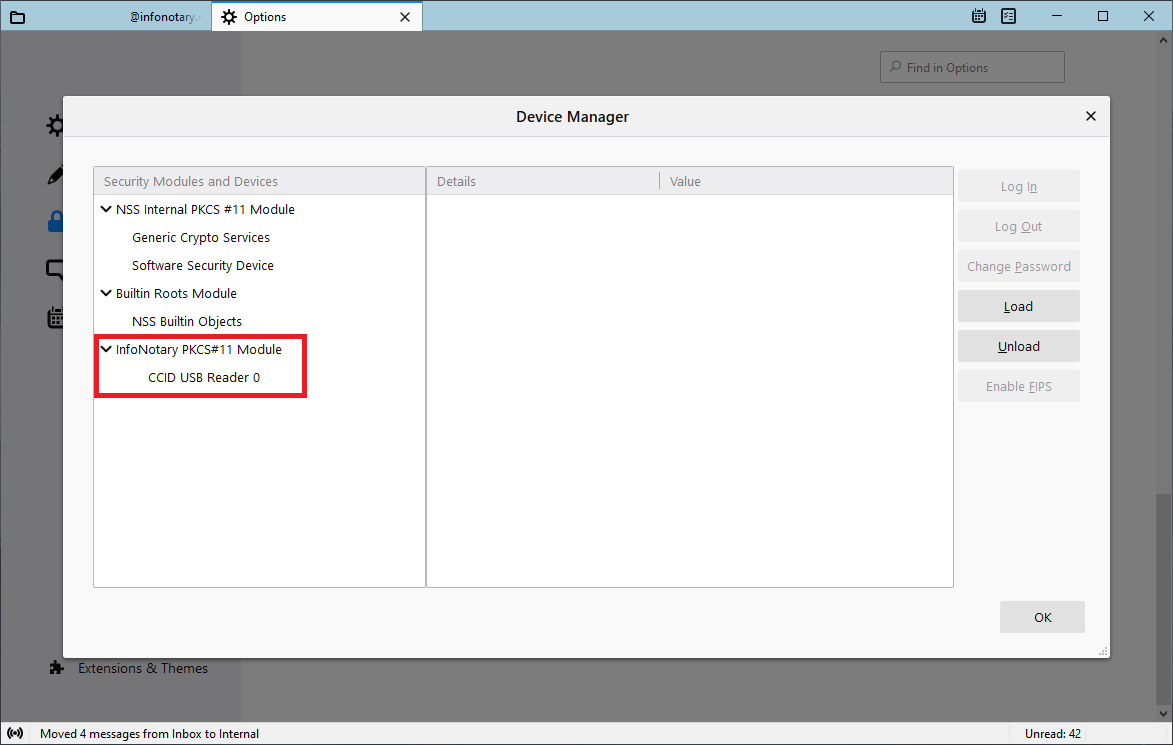
After you click OK, your smart card will appear in the list of available devices.
Configuring use profile in Thunderbird
In order for you to sign your outgoing mails, you have to associate your account with your digital signature on your smart card. To do this follow the steps below:
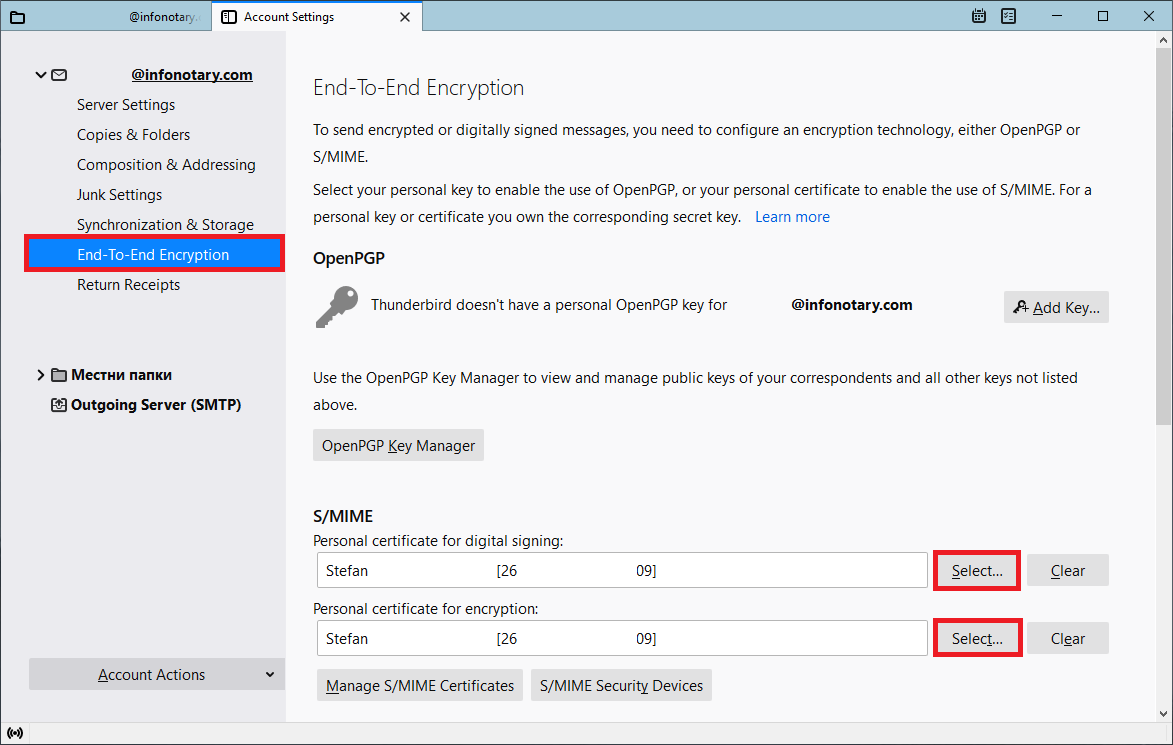
From the menu, select Account Settings.
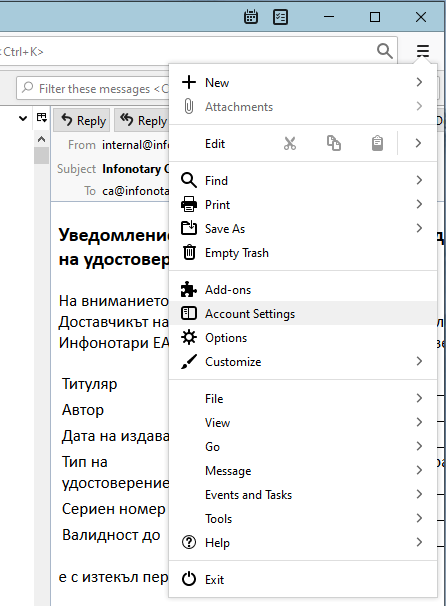
Press the Select button on "Personal certificate for digital signing" and "Personal certificate for encryption"
A window will appear where you can specify your certificate.
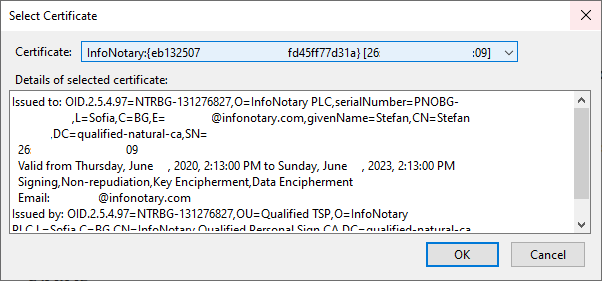
Choose the appropriate certificate from the smart card and confirm by clicking OK.
Thunderbird will offer you to choose the same certificate for decrypting messages send to you.
What is nessesary to work with digital signature
In order to use your digital sigature is nessesary to install the driver for the smart card reader, the middleware for the smart card and the service for smart card resders (pcscd) running. The service pcscd must start automatically when you plug a reader.
Driver for readers
ACR 38C

If the your reader is labeled with ACR38C-SPC-R, mLector-S or ACR39T at the bottom, then your device works with the build in driver in the OS and you don't have to install any drivers.
Circle CIR115
For you to use Circle, you have to install the driver for your version of macOS:
Omnikey (HID Global)
For you to use OmniKey CardMan, you have to install the driver from HID Global for your version of macOS:
Install Smart Card driver
Depend of the model of your card you have to use different driver. The model of the card is on the Personal Access Rights, which you receive with your card. You can find your smart card model with our diagnostic software tool
For smart card IDPrime
You can download the latest version for your OS from here:
After the installation continue with configuration Firefox or Safari.
For smart card Bit4ID/Idemia
Please write to support@infonotary.com , and we will send you the driver.
After the installation continue with configuration Firefox or Safari
.
For smart card Siemens CardOS
For smart card Siemens you must install OpenSC. With OpenSС you dont install any program with graphic interface so you wont find anything in Applications.
You can download the latest version for your OS from here:
After the installation continue with configuration for Firefox or Safari.
Testing Installation
If you have problem using your certificate, you can run the following program to identify it:
The program can send information directly to us. After report is accepted, it will show nine digit number, that can be used by our support team to see test result. If you do not have Internet connection or direct sending failed, you can save report and send it to support@infonotary.com.
Reader and card should be connected to the computer when test program is started.
- IMPORTANT: In order to use your digital signature with Safari, Mail and other programs, that supports Keychain integrations, first you have to install InfoNotary certificate chain.
- IMPORTANT: LINK FOR DOWNLOAD HERE.
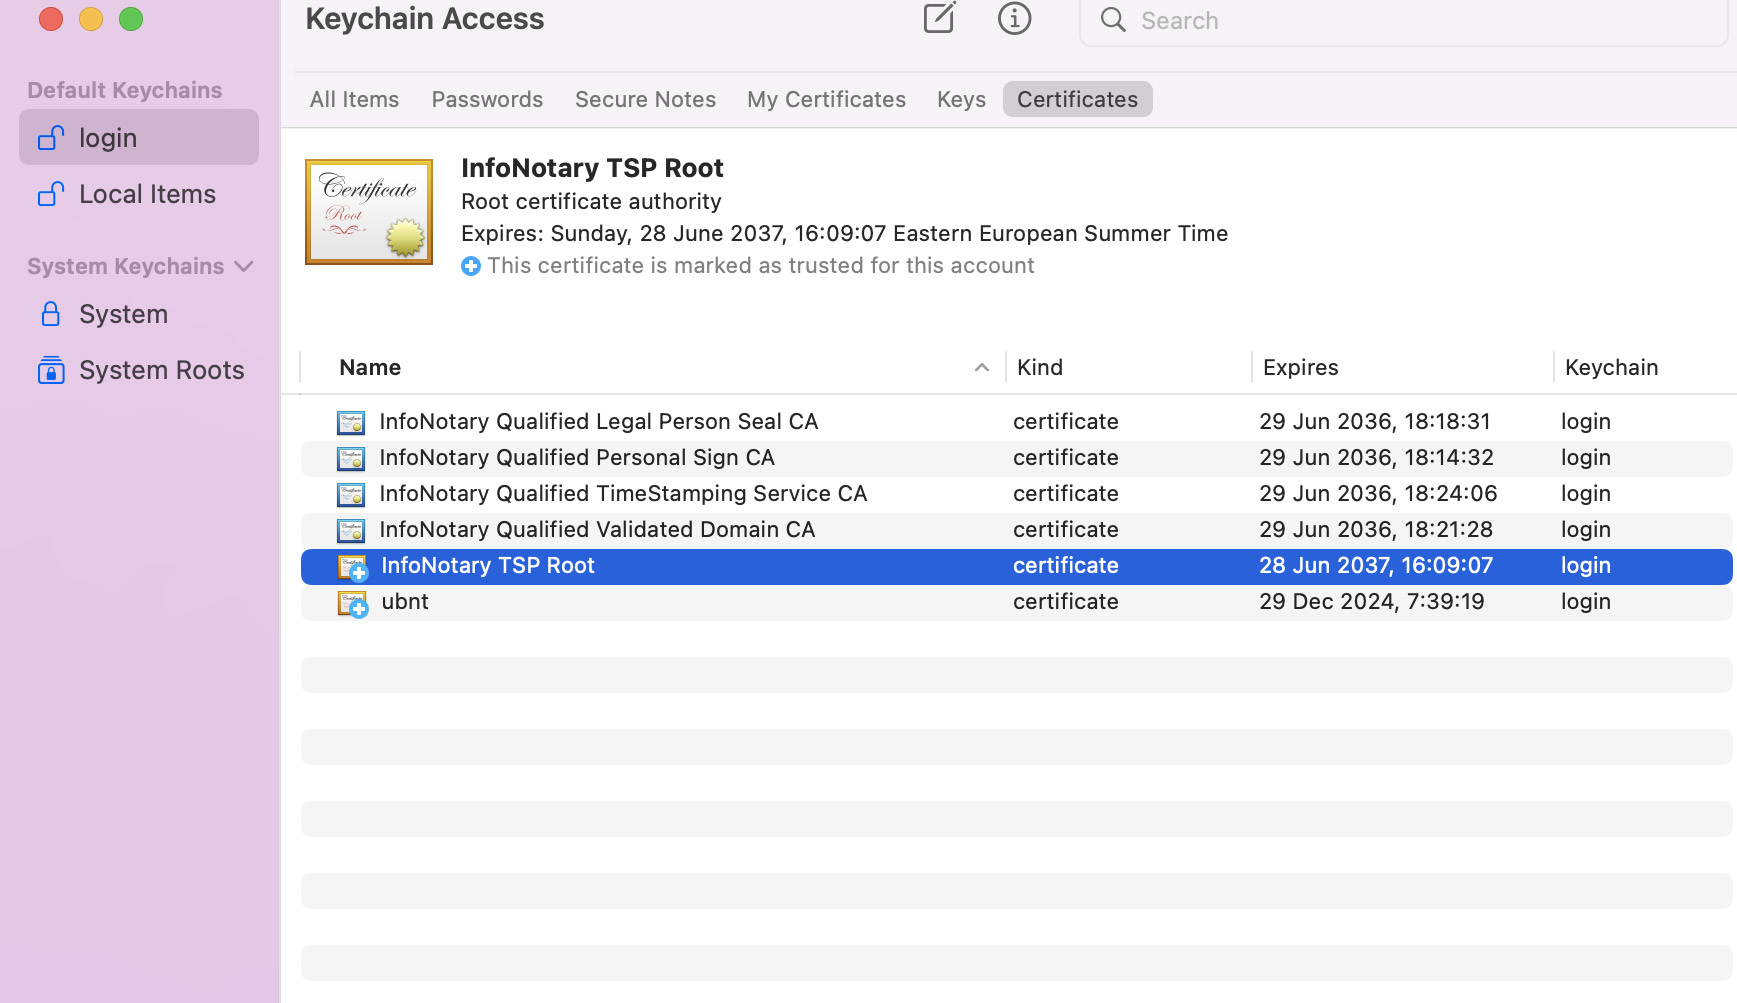
Once the certification chain is downloaded and opened, it will start automatically Keychain Access, where you need to select InfoNotary TSP Root from the Certificates category.
Click on Always Trust to make InfoNotary root certificate trusted.
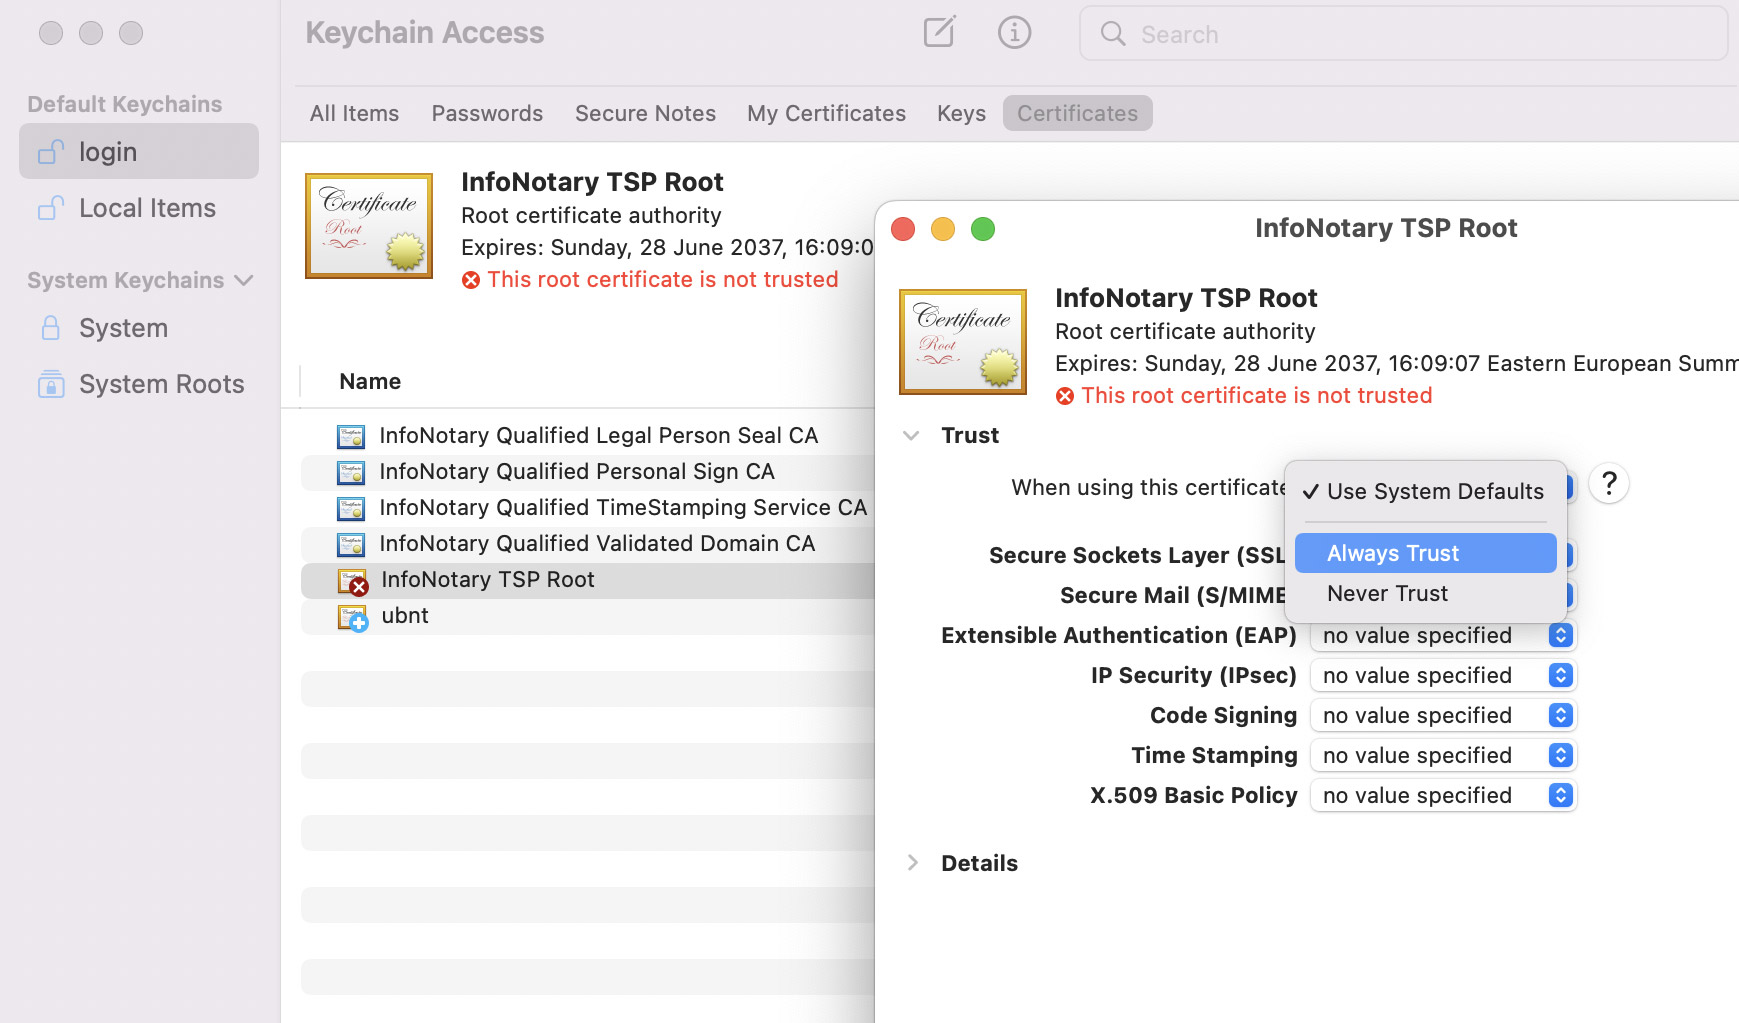
Keychain Access will ask for the password of the currently logged-in user.
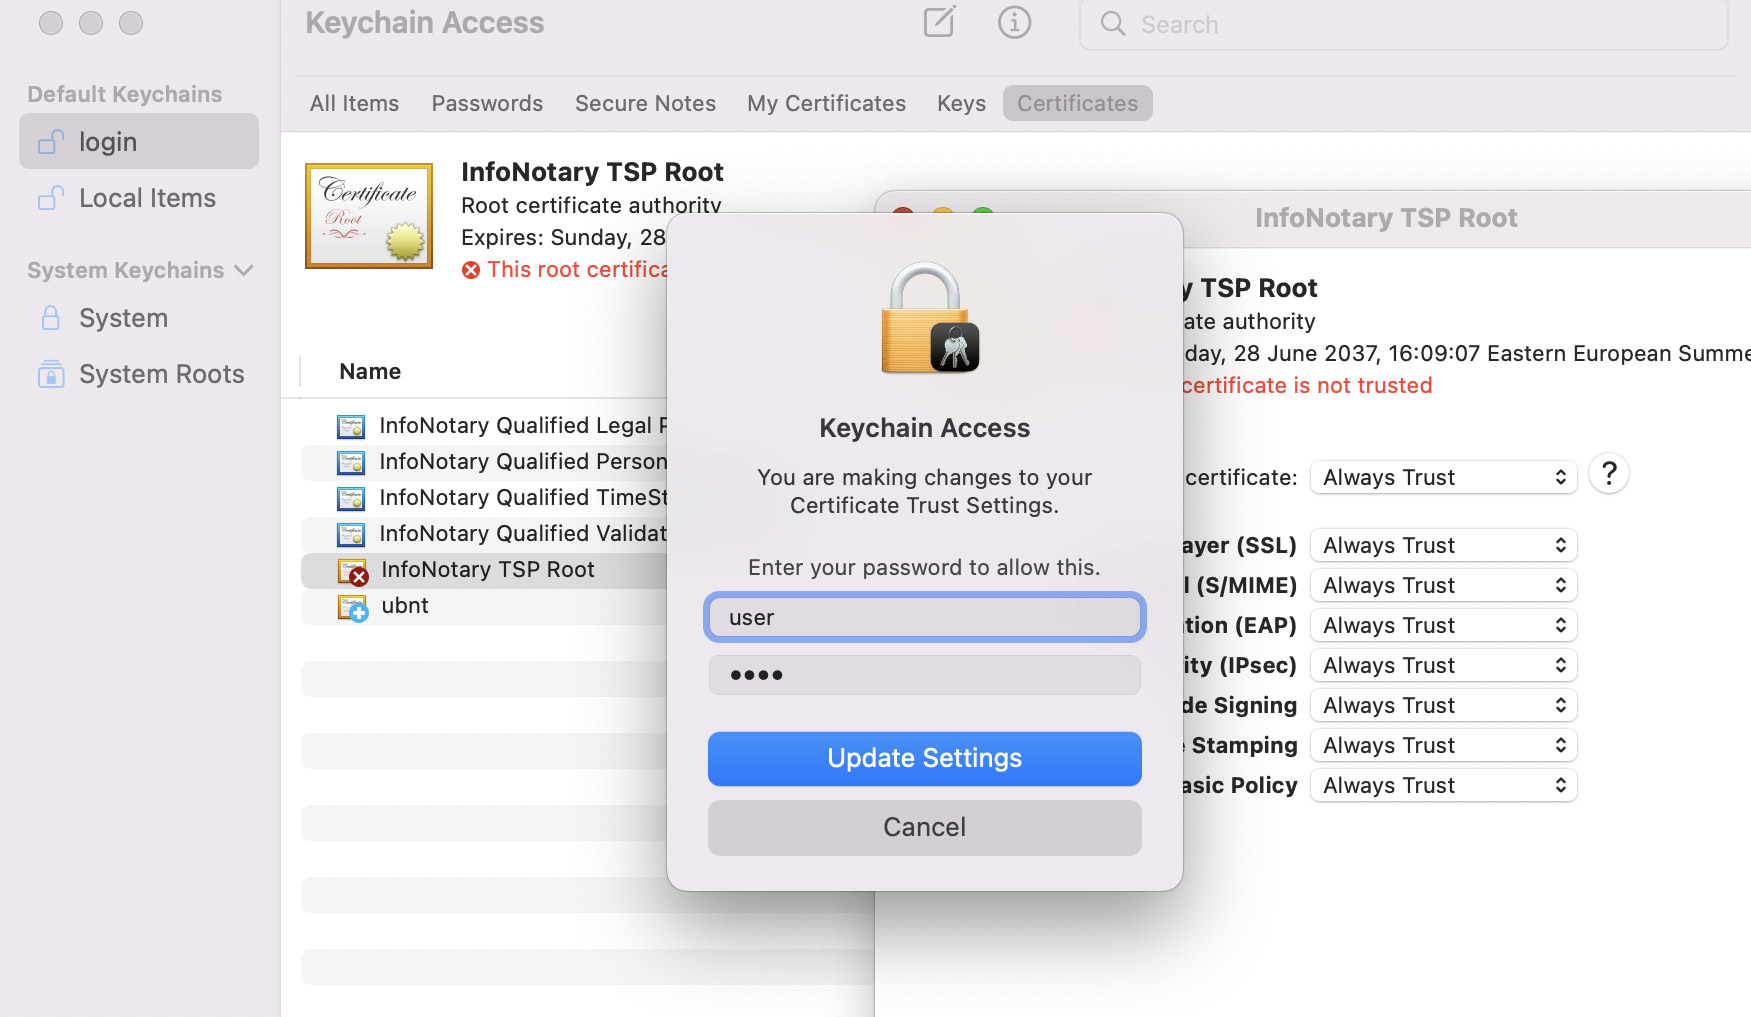
Trust status will be changed to "This certificate is marked as trusted for this account".
⚠ After the installation of our certificate chain you must continue with Installation of smart card reader and smart card drivers in macOS.
Before you proceed you must do
- If you have smart card reader and smart card from InfoNotary, but you didn't install the drivers for them do the following Installation of smart card reader and smart card drivers in Mac OS X
- IMPORTANT: In the information message "Please enter the master password for InfoNotary", enter your PIN code.
- IMPORTANT: Firefox and Thunderbird use direct access to the smart card. When you have successfully installed your certificates, you SHOULD NOT delete them from there, as this will also delete the certificate, along with the private and public keys on the smart card. After that, the certificate cannot be restored and a new one must be issued.
- IMPORTANT: In order to use your certificate with Firefox and Thunderbird, the reader must be on your computer before opening the program.
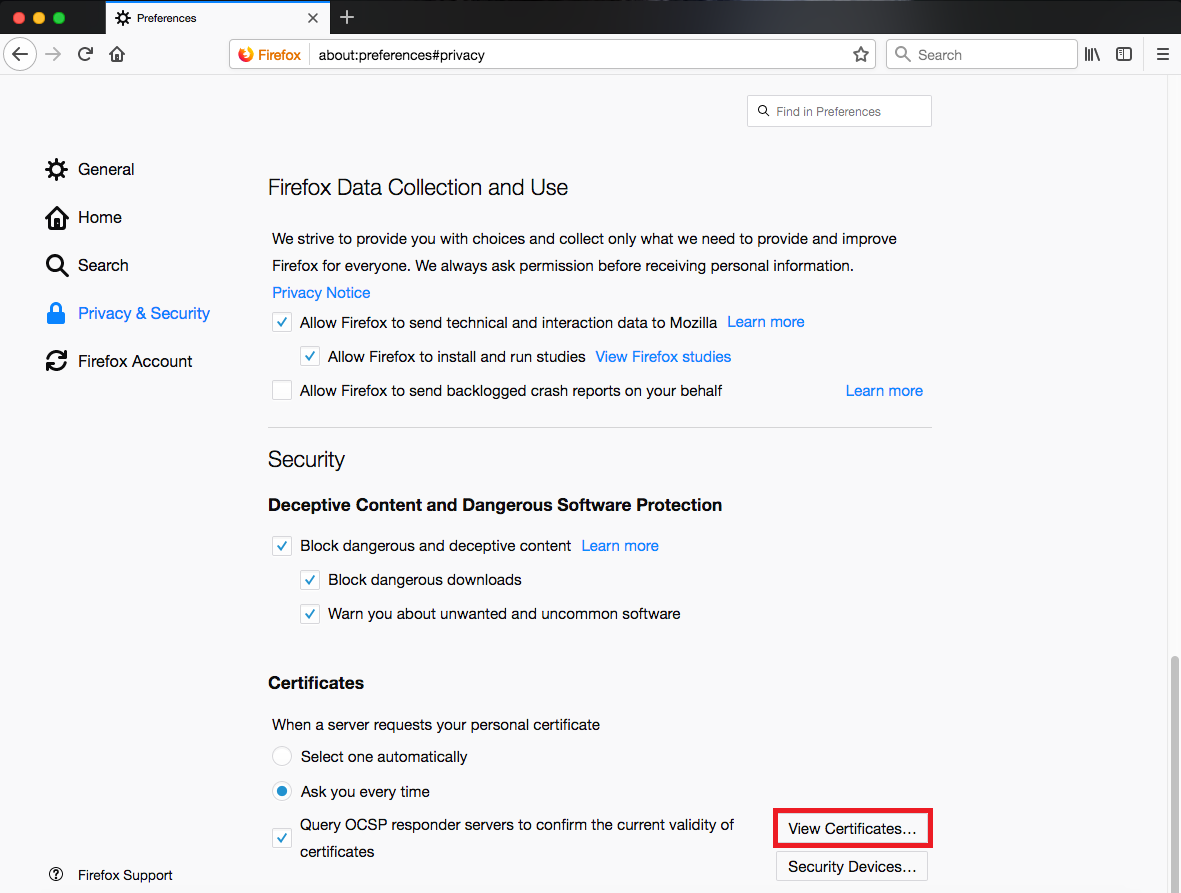
Install Infonotary certificate chain
Start Mozilla Firefox. From the menu, choose Preferences.
From Privacy & Security, choose View Certificates.
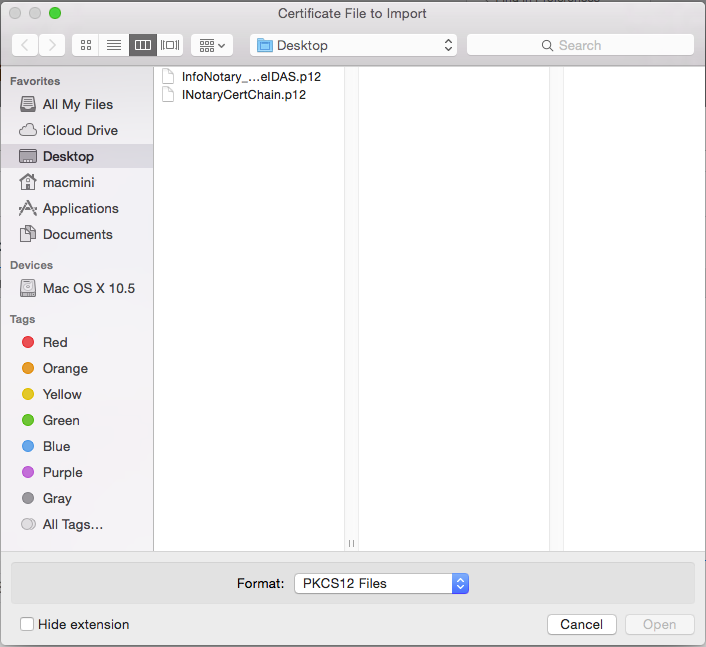
Choose the tab Your certificates and click on Import.
Specify the path to certification chain - InfoNotary_Qualified_eIDAS.p12
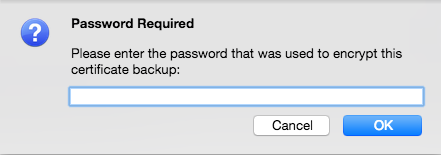
Leave the field blank and click OK.
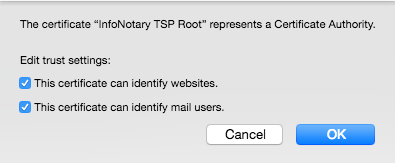
Newly installed certificates can be found in section Authorities.
In Mozilla for every certificate of a Certification Authority (CA) the user must choose a level of trust. This is done by selecting the certificate and clicking on Edit Trust. The easiest way to do this setting for the certificate "InfoNotary TSP Root" select two possible options. This will make all the InfoNotary trusted certificates for all operations.
Install software security module
In order to use you digital certificate with Mozilla based applications like Firefox, Thunderbird etc., you must register PKCS#11 module, for your smart card. It is nessesary to install the drivers for the smart card before that.
Start Firefox Quantum. From the menu, choose Preferences.
From Privacy & Security, choose Security Devices.
To add a new device, choose Load.
Change the name of the module (Module Name), as desired.
Select PKCS # 11 library corresponding to your smart card.
- IDPrime - /Library/Frameworks/eToken.framework/Versions/A/libIDPrimePKCS11.dylib
- OpenSC - /Library/OpenSC/lib/opensc-pkcs11.so
- Bit4ID - /Library/bit4id/pkcs11/libbit4ipki.dylib
- Siemens - /usr/local/lib/libsiecap11.dylib
After you click OK, your smart card will appear in the list of available devices.
For Ubuntu 21.04 and older, Debian and Mint
1. Add the InfoNotary PGP key to the apt trusted key list:
wget -qO - https://repository.infonotary.com/install/linux/INotaryCodeSigningD.key.asc | sudo apt-key add -
2. Download the configuration file to the directory where the apt repository information is stored:
sudo wget https://repository.infonotary.com/install/linux/infonotary.list -qO /etc/apt/sources.list.d/infonotary.list
3. Update the repository information with the following command:
sudo apt-get update
For Ubuntu 22.04
1. Add the InfoNotary PGP key to the apt trusted key list:
wget -qO - https://repository.infonotary.com/install/linux/INotaryCodeSigningD.key.asc | sudo tee /etc/apt/trusted.gpg.d/INotaryCodeSigningD.key.asc
2. Download the configuration file to the directory where the apt repository information is stored:
sudo wget https://repository.infonotary.com/install/linux/infonotary_u2204.list -qO /etc/apt/sources.list.d/infonotary.list
3. Update the repository information with the following command:
sudo apt-get update
After completing the above steps, you will be able to install the software from the repository via apt-get, aptitude, Software Center or Synaptic.
Installation of programs from the repository
Installation for Bit4id smart cards:
sudo apt-get install bit4id-ipki
Installation for Siemens smart cards:
sudo apt-get install opensc
Installation of our smart card management software (Smart Card Manager) and for signing documents (e-Doc Signer)
sudo apt-get install infonotary-client-software
- IMPORTANT for Ubuntu 22.04: After installing the driver for your smart card is necessary to start PC/SC Smart Card Daemon.
Please, write the following commands in terminal:
systemctl enable pcscd
service pcscd start
For Fedora, RHEL, CentOS
To register the Infonotary repository in yum or dnf, you need to install the following rpm package. This can be done with the following command:
sudo rpm -Uvh https://repository.infonotary.com/install/linux/RPMS/infonotary-repository-1-1.noarch.rpm
All packages in the repository are signed with a gpg key with the following fingerprint:
9c14 29cf 1cdb 76bd 5efe 9cf1 ade8 9959 0dae 44fe
Installation of programs from the repository
Installation for Bit4id smart cards:
sudo yum install bit4id-ipki
Installation for Siemens smart cards:
sudo yum install opensc
Installation of our smart card management software (Smart Card Manager) and for signing documents (e-Doc Signer)
sudo yum install infonotary-client-software
Before proceeding you must do
If you have smart card reader and smart card from InfoNotary, but you didn't install the drivers for them do the following use repositories of InfoNotary.
- IMPORTANT: Chromium uses direct access to the smart card. When you have successfully installed your certificates, you SHOULD NOT delete them from there, as this will also delete the certificate, along with the private and public keys on the smart card. After that, the certificate cannot be restored and a new one must be issued.
Install InfoNotary certificate chain
Before you proceed, you need to download InfoNotary trusted certificates.
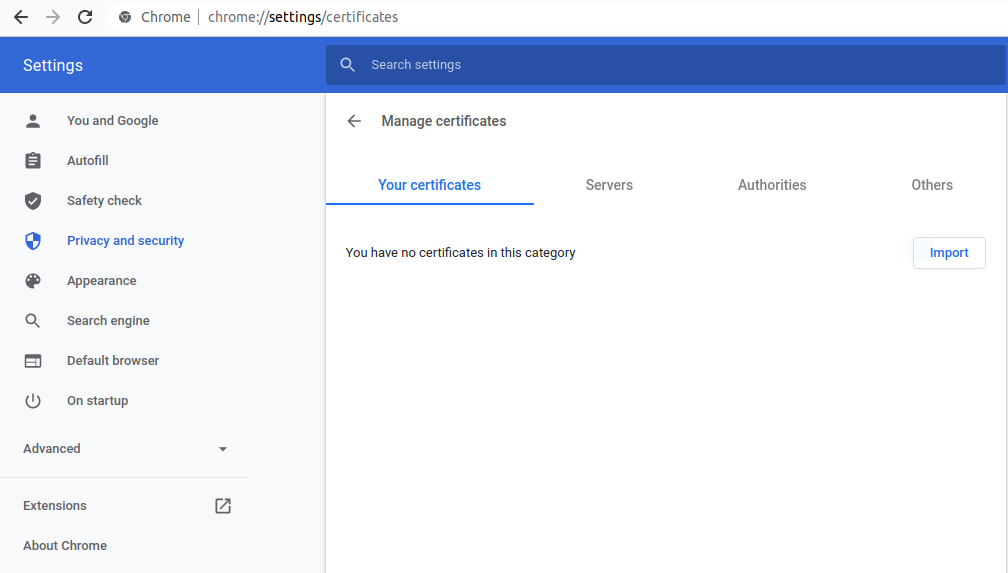
- To install start Chromium and go to Settings > Privacy and security > Security > Manage certificates
- Choose section "Your certificates", click button "Import" and choose the path to the dowloaded file – InfoNotary_Qualified_eIDAS.p12.
After that you will be asked for password. leave the field blank and click OK.
- From section "Authorities" search for InfoNotary TSP Root and click "Edit"
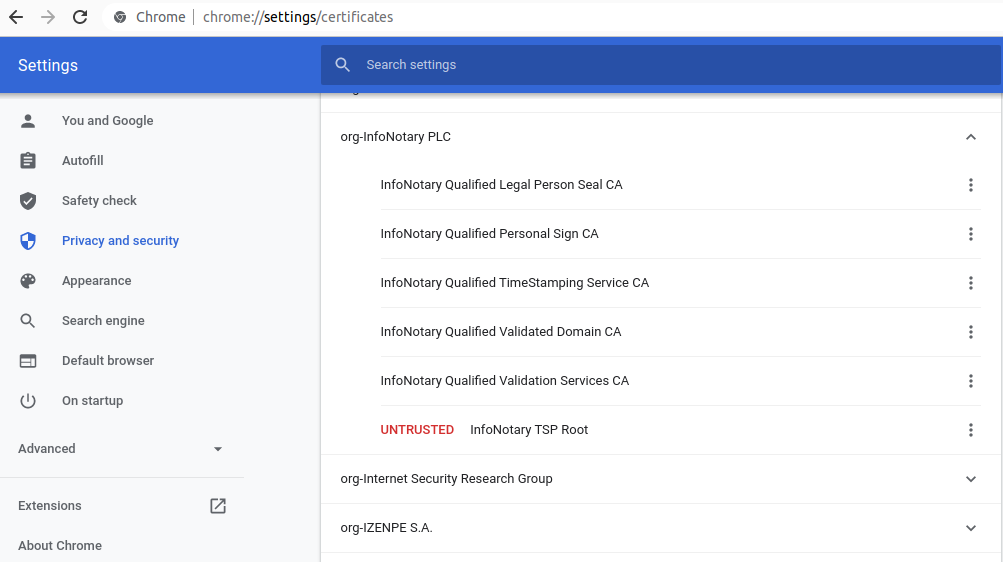
- Marks as it is shown on the screen below:
Adding your smart card PKCS11 library
- After the certificate chain is installed you need to add a PKCS#11 library for your smart card. Because Chromium doesn't have an interface for adding libraries you must do the following:
- Install NSS tools. In Debian based distributions the package is libnss3-tools
- Close Chromium and unplug your reader from your computer.
- Start Terminal
- Create a directory for the database of NSS with the following command - mkdir -p $HOME/.pki/nssdb
- After that add the library using this command:
- for IDPrime - modutil -add "IDPrime" -libfile libIDPrimePKCS11.so -dbdir sql:$HOME/.pki/nssdb -mechanisms FRIENDLY
- for Bit4ID - modutil -add "Bit4id" -libfile libbit4ipki.so -dbdir sql:$HOME/.pki/nssdb -mechanisms FRIENDLY
- for OpenSC - modutil -add "OpenSC" -libfile onepin-opensc-pkcs11.so -dbdir sql:$HOME/.pki/nssdb -mechanisms FRIENDLY
In case you have Siemens driver you must chanhe the library with libsiecap11.so, and the name to Siemens.
Plus the reader and start Chromium.
- Now you can see your certificates in the settings and use them for logins in sites, which require QES.
Example for adding Bit4ID module:
* skk@skk:~$ sudo apt-get install libnss3-tools

Reading package lists... Done
Building dependency tree... Done
Reading state information... Done
The following NEW packages will be installed:
  libnss3-tools
0 upgraded, 1 newly installed, 0 to remove and 4 not upgraded.
Need to get 0 B/1021 kB of archives.
After this operation, 5046 kB of additional disk space will be used.
Selecting previously unselected package libnss3-tools.
(Reading database ... 187133 files and directories currently installed.)
Preparing to unpack .../libnss3-tools_2%3a3.61-1ubuntu2_amd64.deb ...
Unpacking libnss3-tools (2:3.61-1ubuntu2) ...
Setting up libnss3-tools (2:3.61-1ubuntu2) ...
Processing triggers for man-db (2.9.4-2) ...


* skk@skk:~$ mkdir -p $HOME/.pki/nssdb
* skk@skk:~$ modutil -add "Bit4id" -libfile libbit4ipki.so -dbdir sql:$HOME/.pki/nssdb -mechanisms FRIENDLY

WARNING: Performing this operation while the browser is running could cause
corruption of your security databases. If the browser is currently running,
you should exit browser before continuing this operation. Type
'q <enter>' to abort, or <enter> to continue:

Module "Bit4id" added to database.
You can list all added libraries with the following command
modutil -dbdir sql:$HOME/.pki/nssdb -list
For example:
* skk@skk:~$ modutil -dbdir sql:$HOME/.pki/nssdb -list

Listing of PKCS #11 Modules
-----------------------------------------------------------
  1. NSS Internal PKCS #11 Module
	   uri: pkcs11:library-manufacturer=Mozilla%20Foundation;library-description=NSS%20Internal%20Crypto%20Services;library-version=3.61
	 slots: 2 slots attached
	status: loaded

	 slot: NSS Internal Cryptographic Services
	token: NSS Generic Crypto Services
	  uri: pkcs11:token=NSS%20Generic%20Crypto%20Services;manufacturer=Mozilla%20Foundation;serial=0000000000000000;model=NSS%203

	 slot: NSS User Private Key and Certificate Services
	token: NSS Certificate DB
	  uri: pkcs11:token=NSS%20Certificate%20DB;manufacturer=Mozilla%20Foundation;serial=0000000000000000;model=NSS%203

  2. Bit4id
	library name: libbit4ipki.so
	   uri: pkcs11:library-manufacturer=bit4id%20srl;library-description=bit4id%20PKCS%2311;library-version=1.2
	 slots: There are no slots attached to this module
	status: loaded
-----------------------------------------------------------
If want to delete an added library you have to change -add with -delete
modutil -delete "Bit4id" -libfile libbit4ipki.so -dbdir sql:$HOME/.pki/nssdb -mechanisms FRIENDLY
For example:
* skk@skk:~$ modutil -delete "Bit4id" -libfile libbit4ipki.so -dbdir sql:$HOME/.pki/nssdb -mechanisms FRIENDLY WARNING: Performing this operation while the browser is running could cause corruption of your security databases. If the browser is currently running, you should exit browser before continuing this operation. Type 'q' to abort, or to continue: Module "Bit4id" deleted from database.
Before proceeding you must do
- If you have smart card reader and smart card from InfoNotary, but you didn't install the drivers for them do the following use repositories of InfoNotary
- IMPORTANT: In the information message "Please enter the master password for InfoNotary", enter your PIN code.
- IMPORTANT: Firefox and Thunderbird use direct access to the smart card. When you have successfully installed your certificates, you SHOULD NOT delete them from there, as this will also delete the certificate, along with the private and public keys on the smart card. After that, the certificate cannot be restored and a new one must be issued.
- IMPORTANT: In order to use your certificate with Firefox and Thunderbird, the reader must be on your computer before opening the program.
- IMPORTANT for Ubuntu 22.04: The installed Firefox Snap in Ubuntu 22.04 have problems loading libraries for smart cards. It is necessary to download a standard Mozilla Firefox
Install InfoNotary certificate chain
Start Mozilla Firefox. From the menu, choose Preferences.
From Privacy & Security, choose View Certificates.

Choose the tab Your certificates and click on Import.
Specify the path to certification chain - InfoNotary_Qualified_eIDAS.p12
Leave the field blank and click OK.
Newly installed certificates can be found in section Authorities.
In Mozilla for every certificate of a Certification Authority (CA) the user must choose a level of trust. This is done by selecting the certificate and clicking on Edit Trust. The easiest way to do this setting for the certificate "InfoNotary TSP Root" is to select the two possible options. This will make all the InfoNotary trusted certificates for all operations
Install software security module
In order to use you digital certificate with Mozilla based applications like Firefox, Thunderbird etc., you must register PKCS#11 module, for your smart card. It is nessesary to install the drivers for the smart card before that.
Start Firefox Quantum. From the menu, choose Preferences.
From Privacy & Security, choose Security Devices.
To add a new device, choose Load.
Change the name of the module (Module Name), as desired.
Choose PKCS#11 library, that correspondents to your smart card.
IDPrime
- Standart location - /usr/lib/libIDPrimePKCS11.so
- 64 bit version of RedHat/Fedora - /usr/lib64/libIDPrimePKCS11.so
OpenSC - in dependents of your distribution, which you use, it could be:
- 64 bits Debian distributions (Debian, Ubuntu, Mint) - /usr/lib/x86_64-linux-gnu/opensc-pkcs11.so
- 32 bits Debian distributions (Debian, Ubuntu, Mint) - /usr/lib/i386-linux-gnu/opensc-pkcs11.so
- Old versions of Debian/Ubuntu and 32 bit versions of RedHat/Fedora - /usr/lib/opensc-pkcs11.so
- 64 bit versions of RedHat/Fedora - /usr/lib64/opensc-pkcs11.so
Bit4ID
- Standart location - /usr/lib/libbit4ipki.so
- 64 bit version of RedHat/Fedora - /usr/lib64/libbit4ipki.so
Siemens
- Standart location - /usr/local/lib/libsiecap11.so
After you click OK, your smart card will appear in the list of available devices.
Before you proceed you must do
- If you have smart card reader and smart card from InfoNotary, but you didn't install the drivers for them do the following use repositories of InfoNotary
- IMPORTANT: In the information message "Please enter the master password for InfoNotary", enter your PIN code.
- IMPORTANT: Firefox and Thunderbird use direct access to the smart card. When you have successfully installed your certificates, you SHOULD NOT delete them from there, as this will also delete the certificate, along with the private and public keys on the smart card. After that, the certificate cannot be restored and a new one must be issued.
- IMPORTANT: In order to use your certificate with Firefox and Thunderbird, the reader must be on your computer before opening the program.
Install Infonotary certificate chain
Start Mozilla Thunderbird. From the menu, select Preferences.
From Privacy & Security select Manage Certificates.
Choose the tab Your certificates and click on Import.
From the window that appears, select the pre-downloaded certification chain - InfoNotary_Qualified_eIDAS.p12
Leave the field blank and click OK.
Newly installed certificates can be found in section Authorities.
In Mozilla for every certificate of a Certification Authority (CA) the user must choose a level of trust. This is done by selecting the certificate and clicking on Edit Trust. The easiest way to do this setting for the certificate "InfoNotary TSP Root" select two possible options. This will make all the InfoNotary trusted certificates for all operations.
Install software security module
Start Mozilla Thunderbird. From the menu, select Preferences.
From Privacy & Security select Security Devices.
To add a new device, choose Load.
Change the name of the module (Module Name), as desired.
Choose PKCS#11 library, that correspondents to your smart card.
IDPrime
- Standart location - /usr/lib/libIDPrimePKCS11.so
- 64 bit version of RedHat/Fedora - /usr/lib64/libIDPrimePKCS11.so
OpenSC - in dependents of your distribution, which you use, it could be:
- 64 bits Debian distributions (Debian, Ubuntu, Mint) - /usr/lib/x86_64-linux-gnu/opensc-pkcs11.so
- 32 bits Debian distributions (Debian, Ubuntu, Mint) - /usr/lib/i386-linux-gnu/opensc-pkcs11.so
- Old versions of Debian/Ubuntu and 32 bit versions of RedHat/Fedora - /usr/lib/opensc-pkcs11.so
- 64 bit versions of RedHat/Fedora - /usr/lib64/opensc-pkcs11.so
Bit4ID
- Standart location - /usr/lib/libbit4ipki.so
- 64 bit version of RedHat/Fedora - /usr/lib64/libbit4ipki.so
Siemens
- Standart location - /usr/local/lib/libsiecap11.so
After you click OK, your smart card will appear in the list of available devices.
Configuring use profile in Thunderbird
In order for you to sign your outgoing mails, you have to associate your account with your digital signature on your smart card. To do this follow the steps below:
From the menu, select Account Settings.
Press the Select button on "Personal certificate for digital signing" and "Personal certificate for encryption"
A window will appear where you can specify your certificate.
Choose the appropriate certificate from the smart card and confirm by clicking OK.
Thunderbird will offer you to choose the same certificate for decrypting messages send to you.
Before proceeding you must do
- IMPORTANT: More information about Okular
- IMPORTANT: Make sure you have installed the necessary drivers for your smart card and reader from HERE
- IMPORTANT: The following instruction is tested on Ubuntu 22.04 and Okular 21.12.3
Installation of Okular
Install the program thru Terminal with command:
sudo apt-get install okular
Install the program thru Terminal with command:
Adding your smart card library in NSS
Configure your NSS repository:
- Install the NSS tools. In Debian based distribution the necessary package is libnss3-tools:
sudo apt-get install libnss3-tools
- Create a directory for the database of NSS with the following command:
mkdir -p $HOME/.pki/nssdb
- Add the library of your smart card using this command:
For IDPrime:
modutil -add "IDPrime" -libfile libIDPrimePKCS11.so -dbdir sql:$HOME/.pki/nssdb -mechanisms
FRIENDLY
For Bit4ID:
modutil -add "Bit4id" -libfile libbit4ipki.so -dbdir sql:$HOME/.pki/nssdb -mechanisms FRIENDLY
For OpenSC:
modutil -add "OpenSC" -libfile onepin-opensc-pkcs11.so -dbdir sql:$HOME/.pki/nssdb -mechanisms FRIENDLY
Signing PDF documents in Okular
1. Choose the PDF file with File > Open
2. From Tools choose Digitally Sign
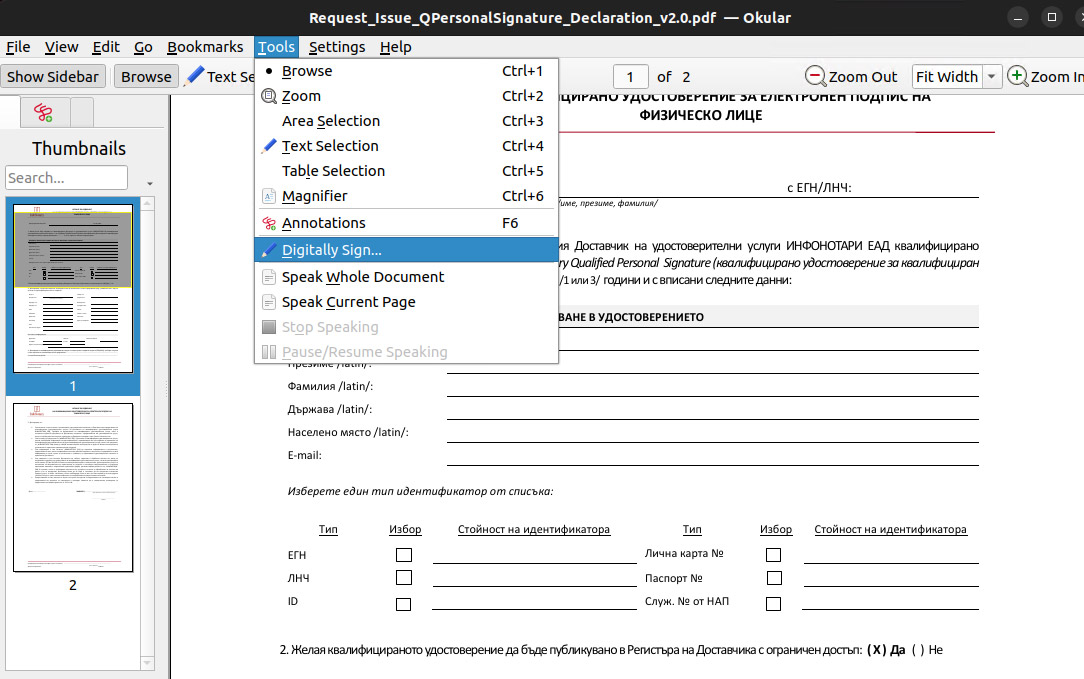
3. Using your mouse, click drag and draw the area where you would like the signature to appear.
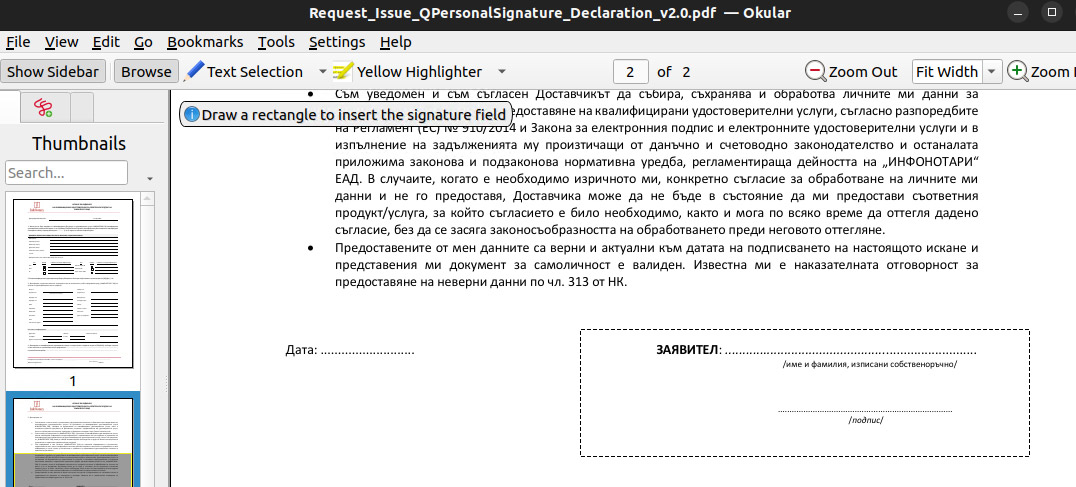
4. Choose your signature and dial your PIN code.
Help and instructions
In case you have a problem with your QES, you can use the following programs to help identify the problem:
The program supports sending the information directly to Infonotary. After successful sending it will display a number that you will need to provide to the support team so they can see the test results. If the send is unsuccessful or you do not have an Internet connection, you can save the test result to a file and send it to support@infonotary.com.
It is desirable to have the reader and card plugged into the computer when running the test.
Linux
On Linux this program uses one of following packages to show its user interface - python-tk for Debian/Ubuntu, tkinter for Fedora/RedHat or zenity. If you do not have any of them installed, it will still work, but only from terminal.
Some distributions disables starting of programs from file manager. In this case you can do the following - open terminal, drag executable file from file manager, drop it on terminal and press Enter key to start it.
Alternative method to start our test program is to copy file in clipboard and paste it in terminal. After this you must remove first part of file address (file://), until only one slash (/) is left in the start. After this you can start it with Enter.
In both cases you should see path like this one in terminal - /home/test/Downloads/SystemInfo/SystemInfo-x86_64
In case you dialed three wrong PIN codes your card is blocked and you need to unblock your PIN, using Infonotary Smart Card Manager.
Install Infonotary Smart Card Manager - Windows (32 bit or 64 bit), Mac, Linux (Fedora, Red Hat x86 or amd64; Debian, Ubuntu, Mint x86 or amd64).
Open Smart Card Manager, mark yours smart card (InfoNotary) and choose Unblock PIN
Enter your AIN code in the new window and type your new PIN code twice. The AIN code can be found on the printout, titled "Smart Card Access Rights", which you received along with you smart card (sample printout).
Warning: In case you enter three times wrong AIN for Bit4id and five times for Siemens you will permanently block the smart card and it should be replaced!
For version Adobe Reader DC
Signing PDF files with Acrobat Reader DC v.2020.006.20034 or newer.
- You can download the program from HERE
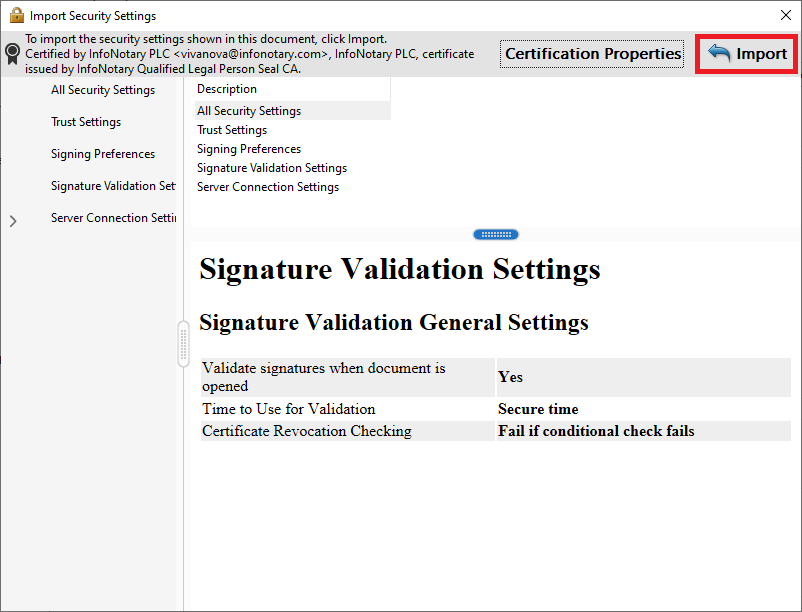
Security setting import
THE SETTING IS IMPORTANT FOR REMOTE RENEWAL/REISSUE OF CERTIFICATE
1. From menu Edit, select Preferences
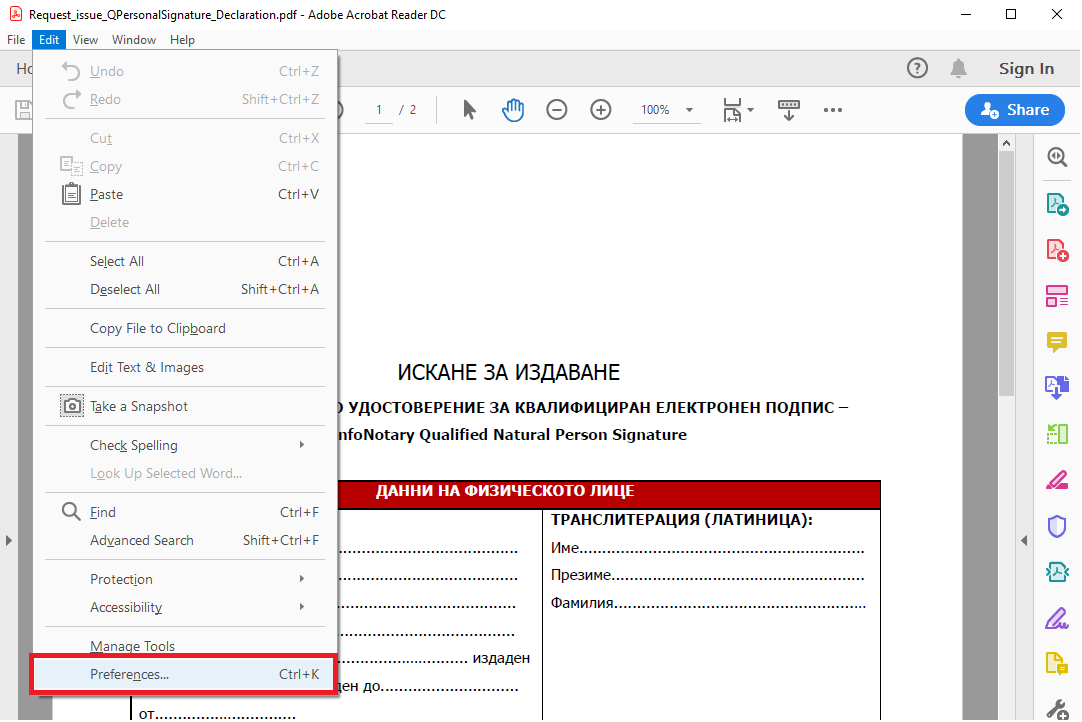
2. Make sure that you already download the file - SecuritySettings2.acrobatsecuritysettings, which contains all the necessary settings.
- IMPORTANT: Do not attempt to open the SecuritySettings2.acrobatsecuritysettings file directly, you must import it through Adobe Acrobat Reader DC.
From Security select Import
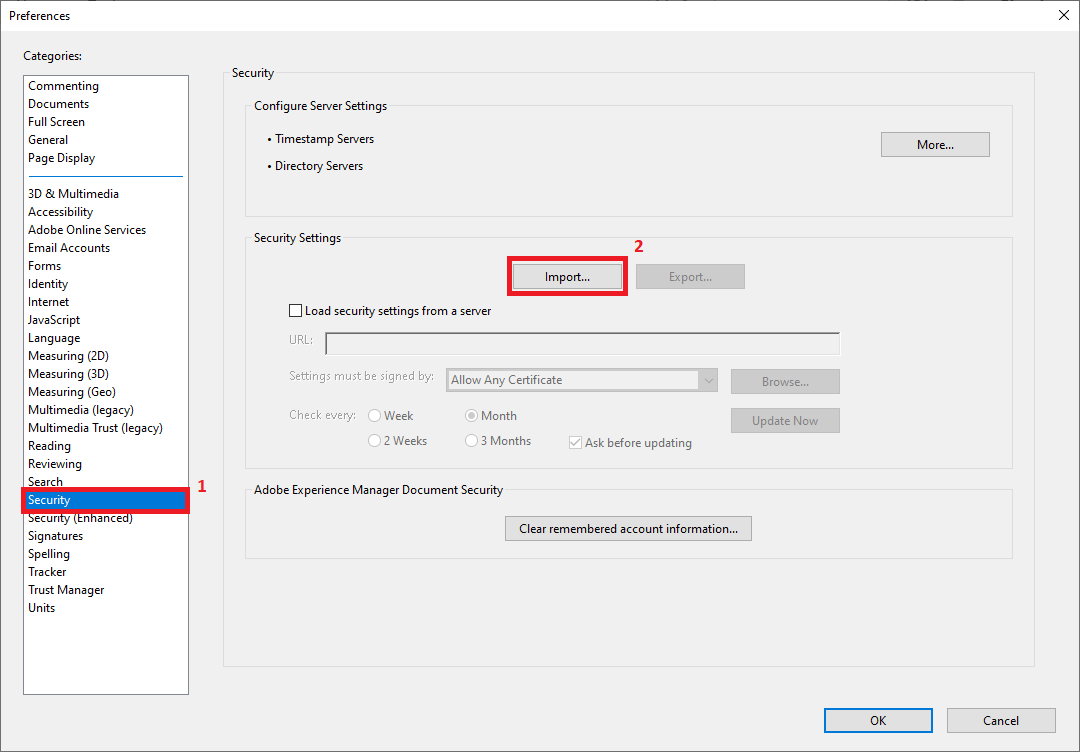
With the correct path to the SecuritySettings2.acrobatsecuritysettings file, a window will be displayed to make the required setting.
Select Import
Signing documents
1. Open the pdf file/document
2. From Tools menu, select Certificates
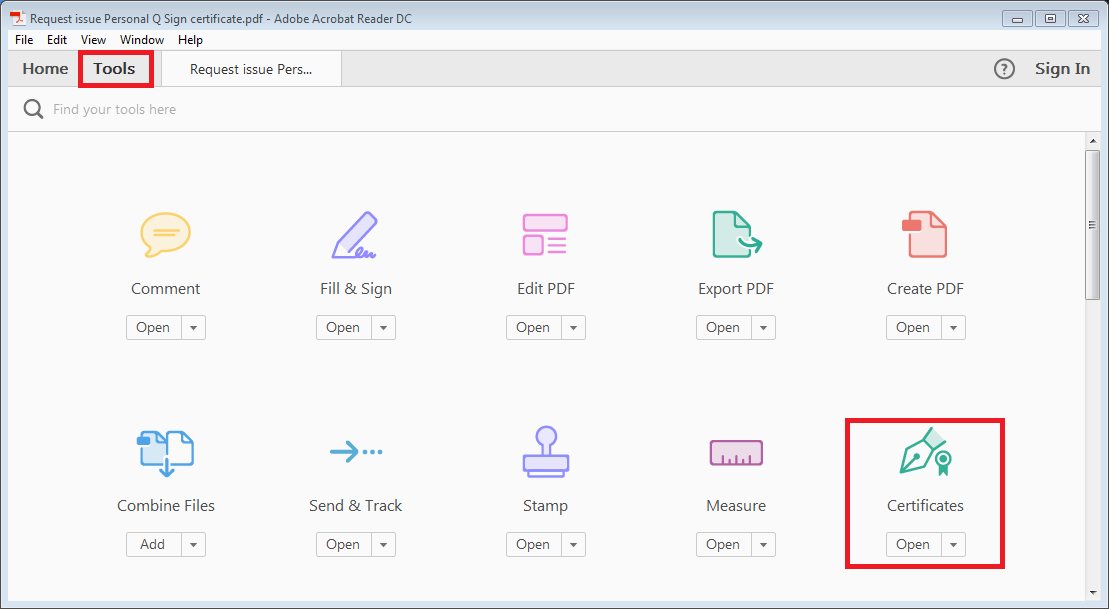
3. Select Digitally Sign
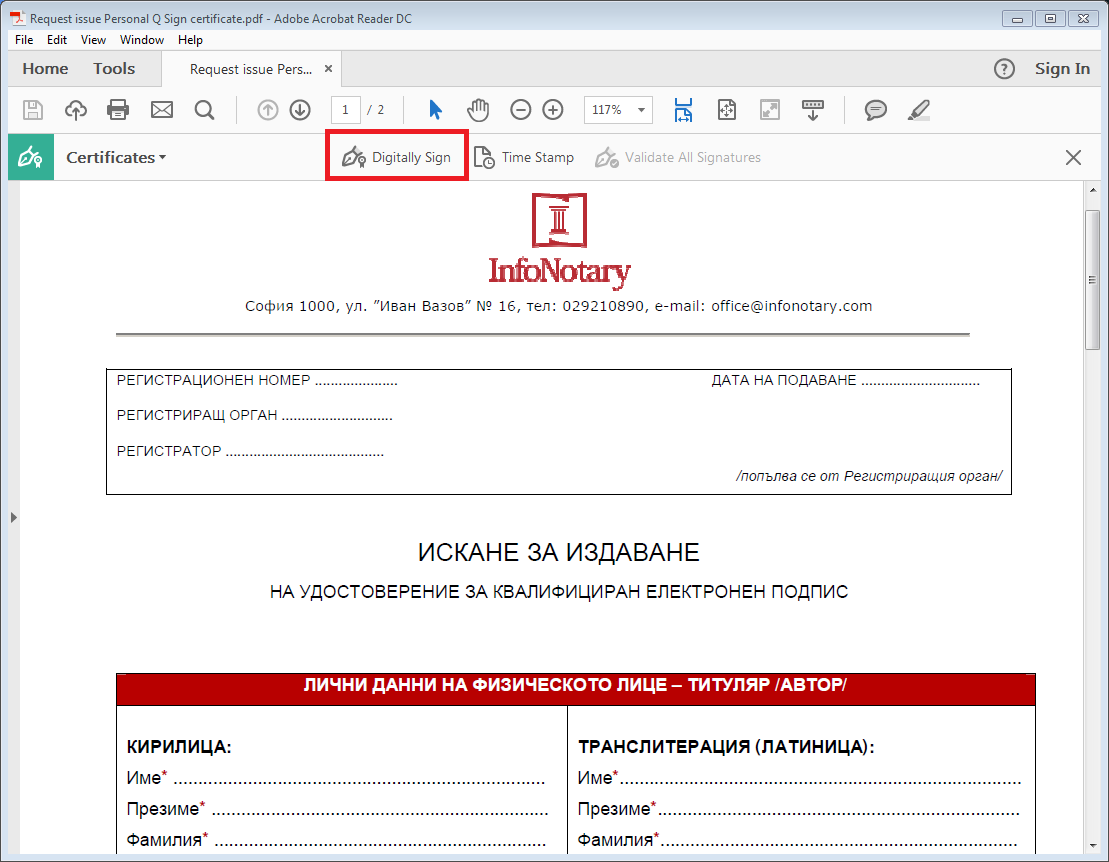
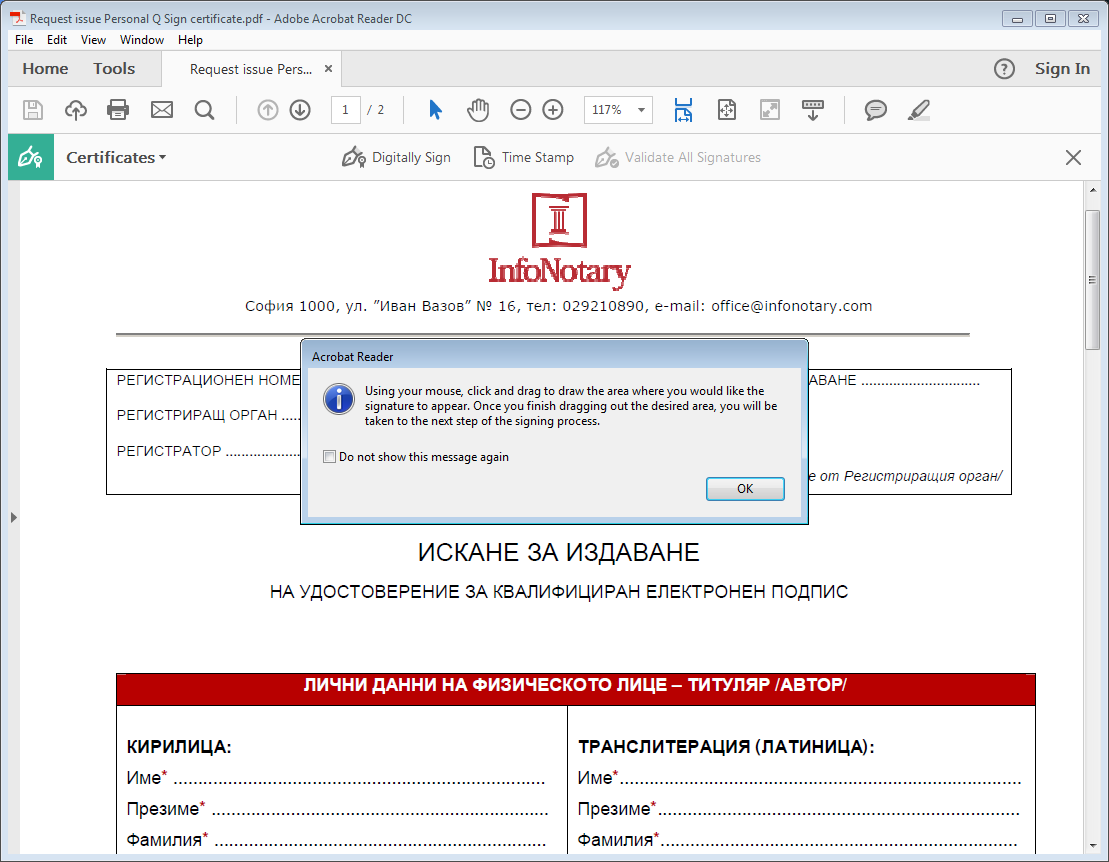
4. Use your mouse, click drag and draw the area where you would like the signature to appear
5. You will be asked to choose the certificate, which you want to use for signing and press Continue
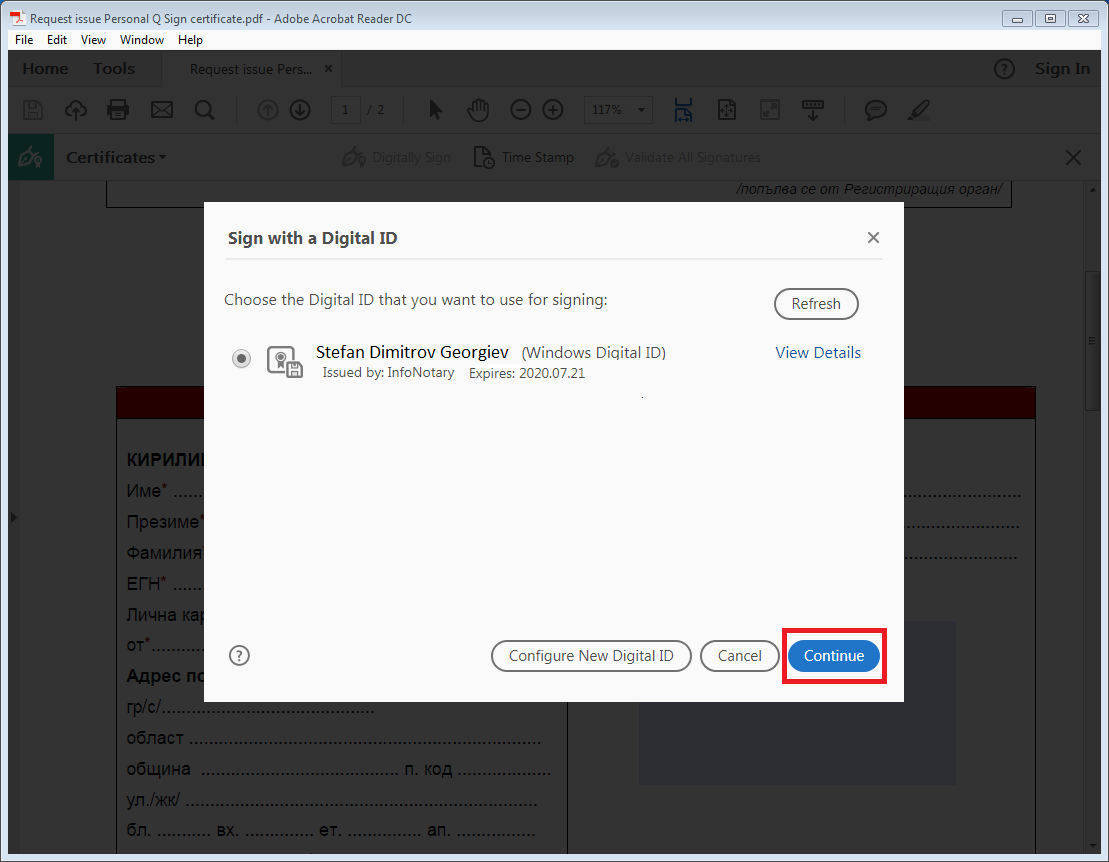
6. Choose Sign
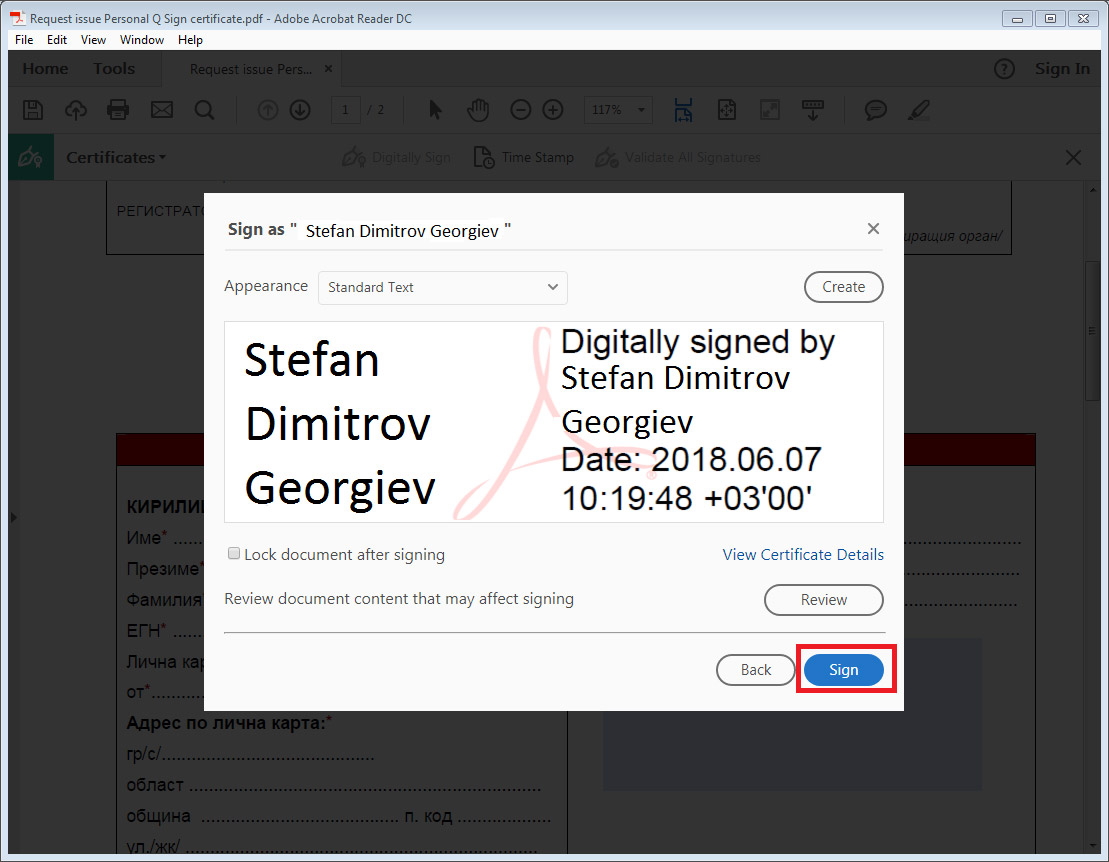
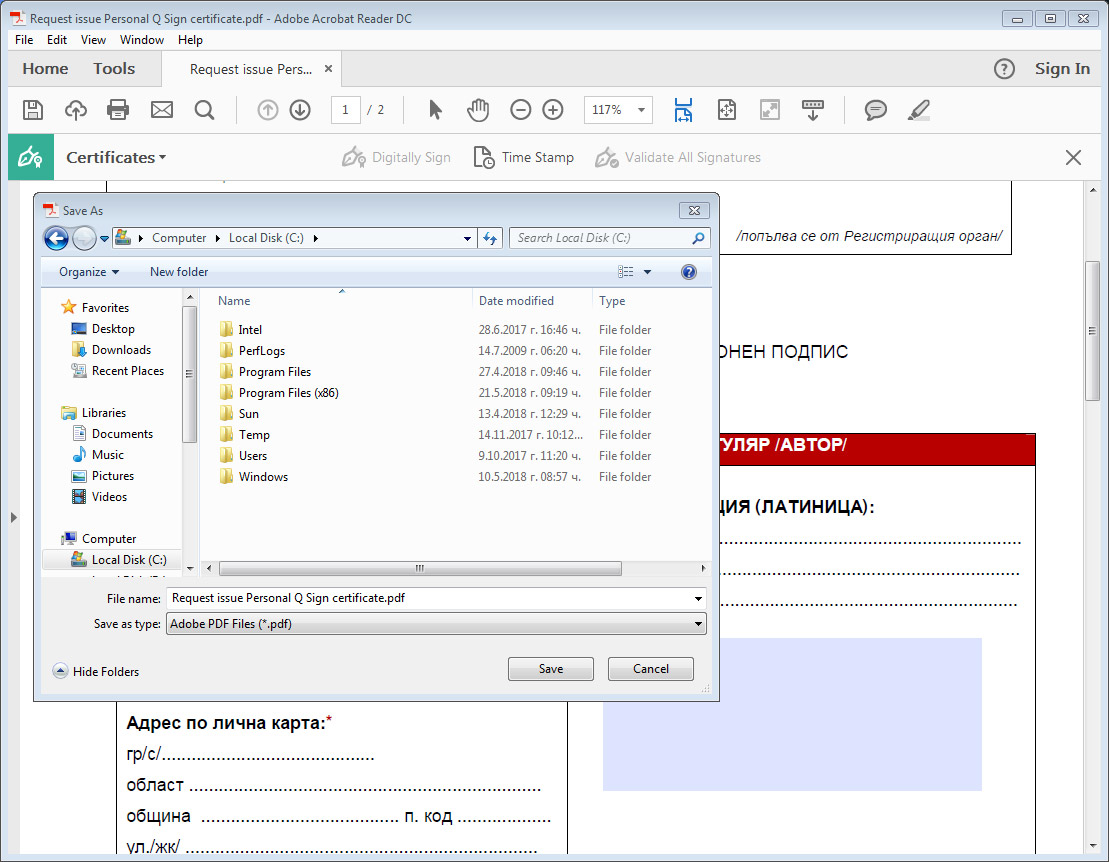
7. After you choose your certificate you will be asked to save or overwrite the file.
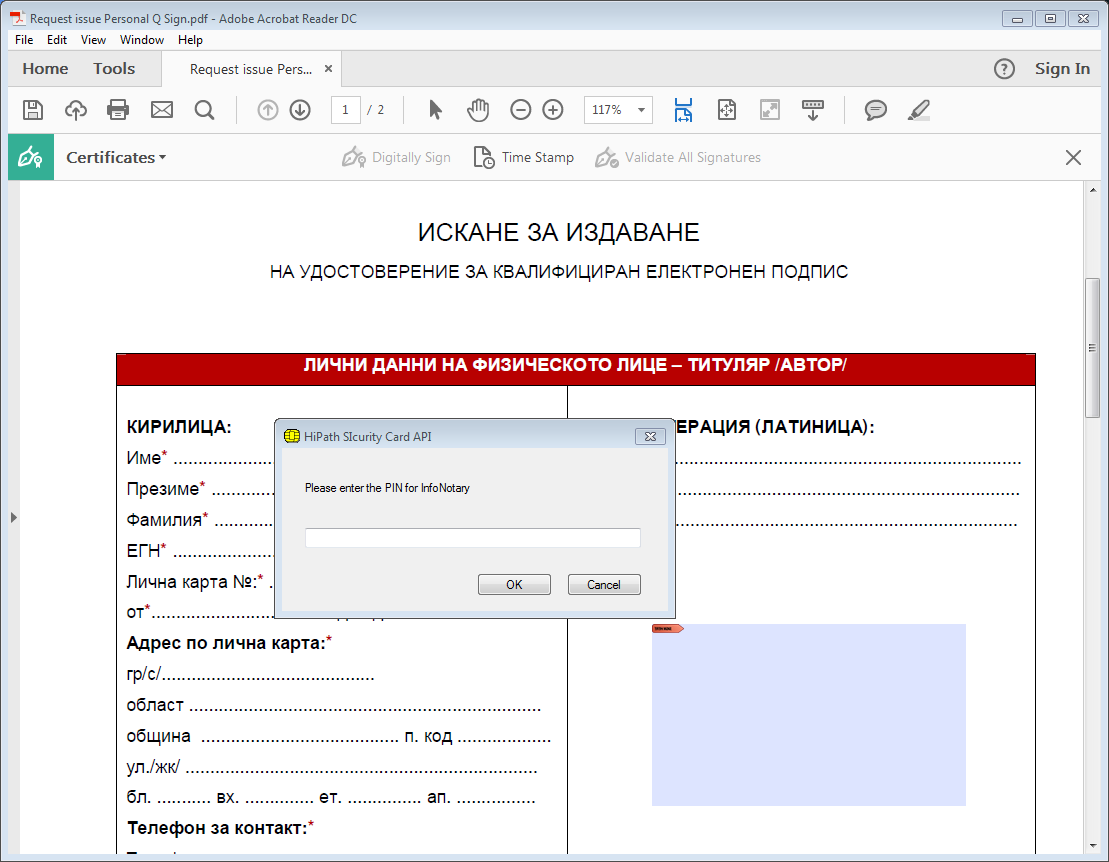
8. It will appear a window, which will ask you for the PIN
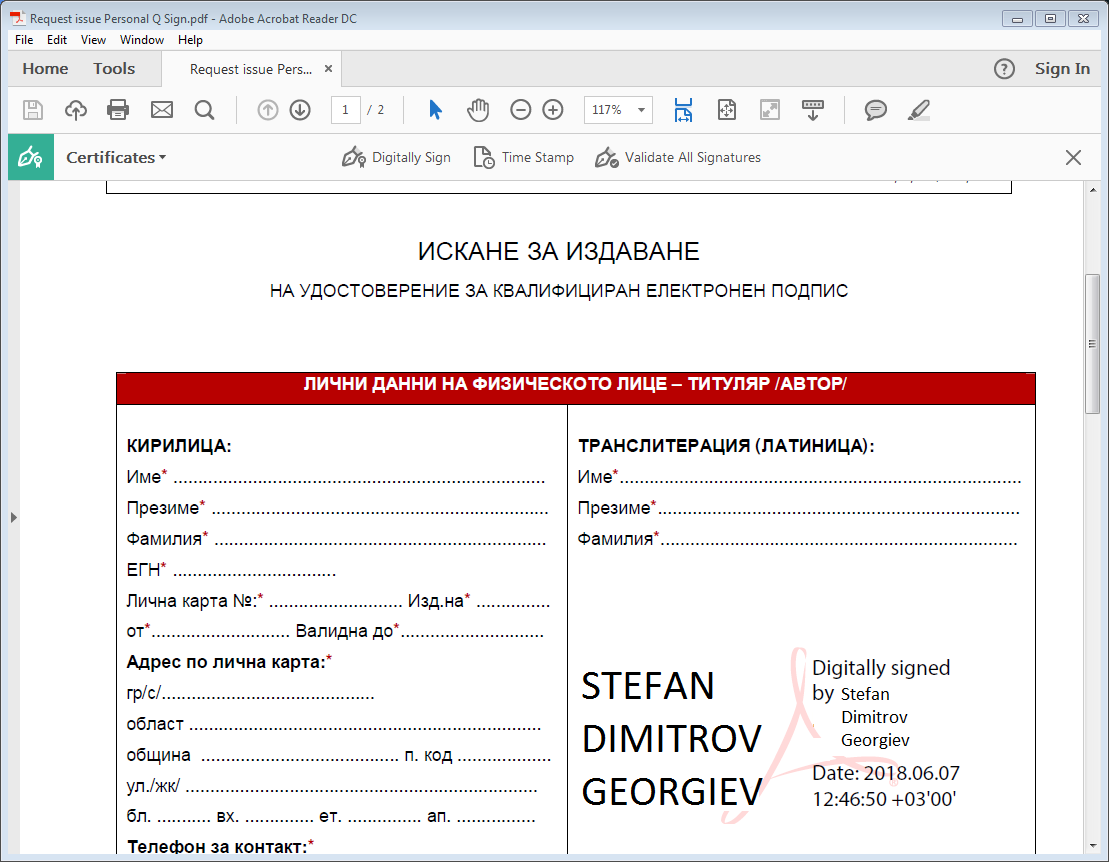
9. In the area you've draw it will visualize the names of the signer, date and time of the signing
Manually import a library for smart card
Manually import in Windows
THIS SETTING IS NECESSARY ONLY IF YOUR CERTIFICATE IS NOT VISUALIZED WHEN ATTEMPTING TO SIGN OR THE PIN CODE WINDOW IS NOT SHOWING!
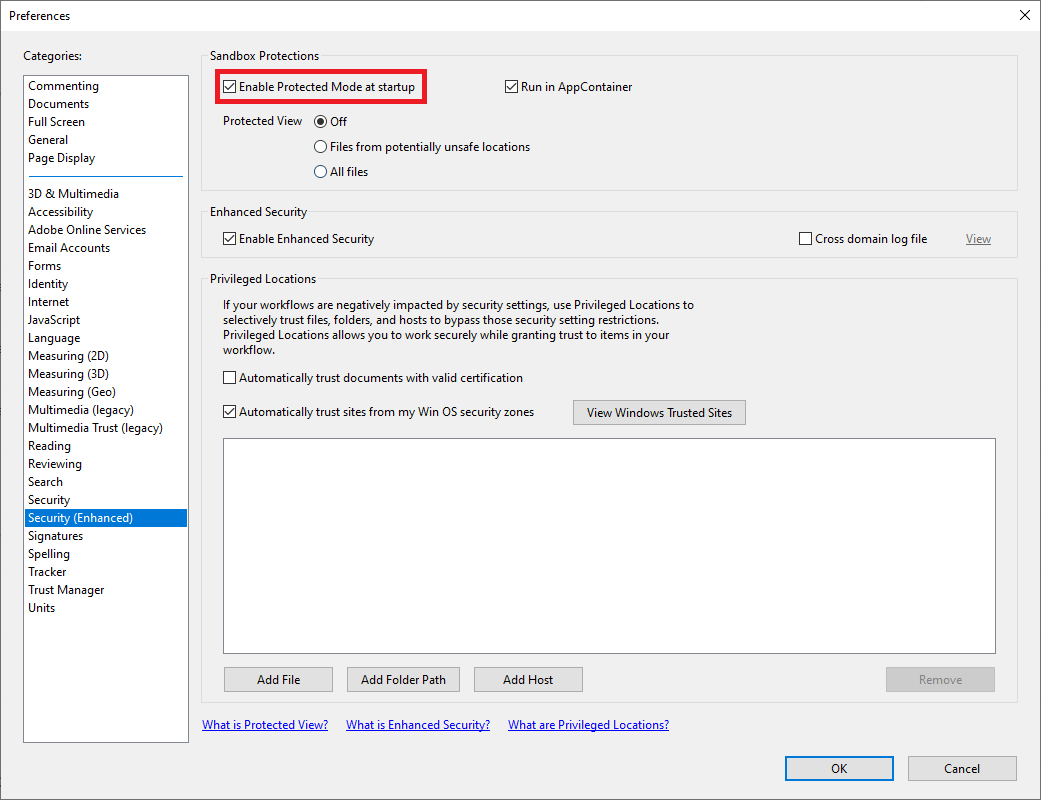
1. From menu Edit, select Preferences
2. Select category Signatures (Enhanced) and uncheck "Enable Protected Mode at startup" after that restart Adobe Acrobat Reader DC
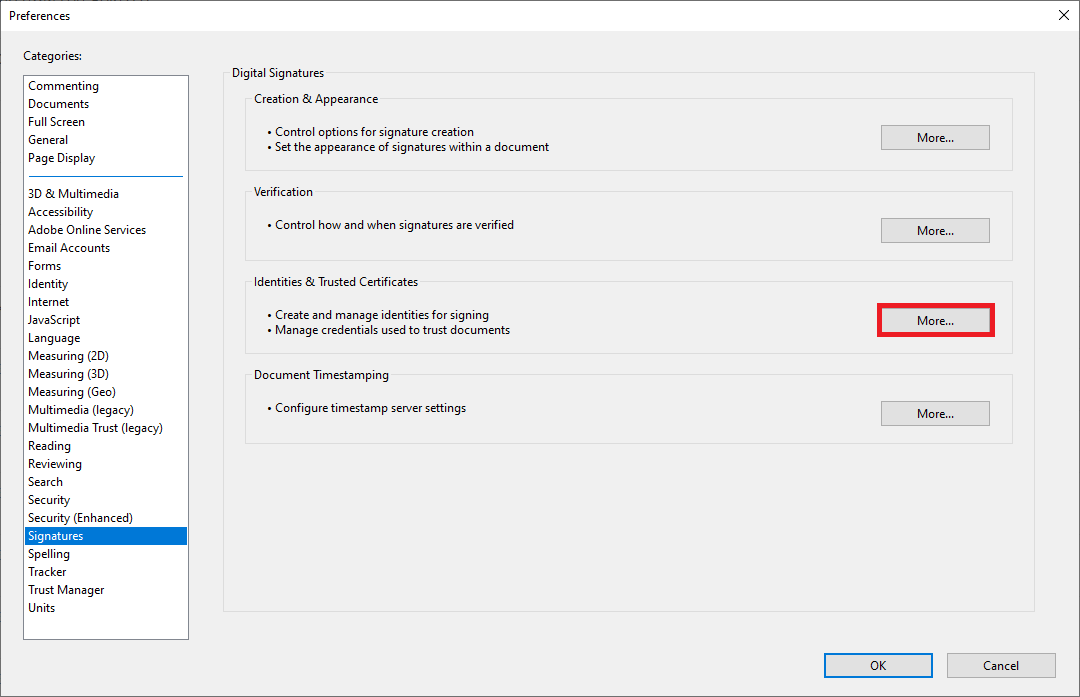
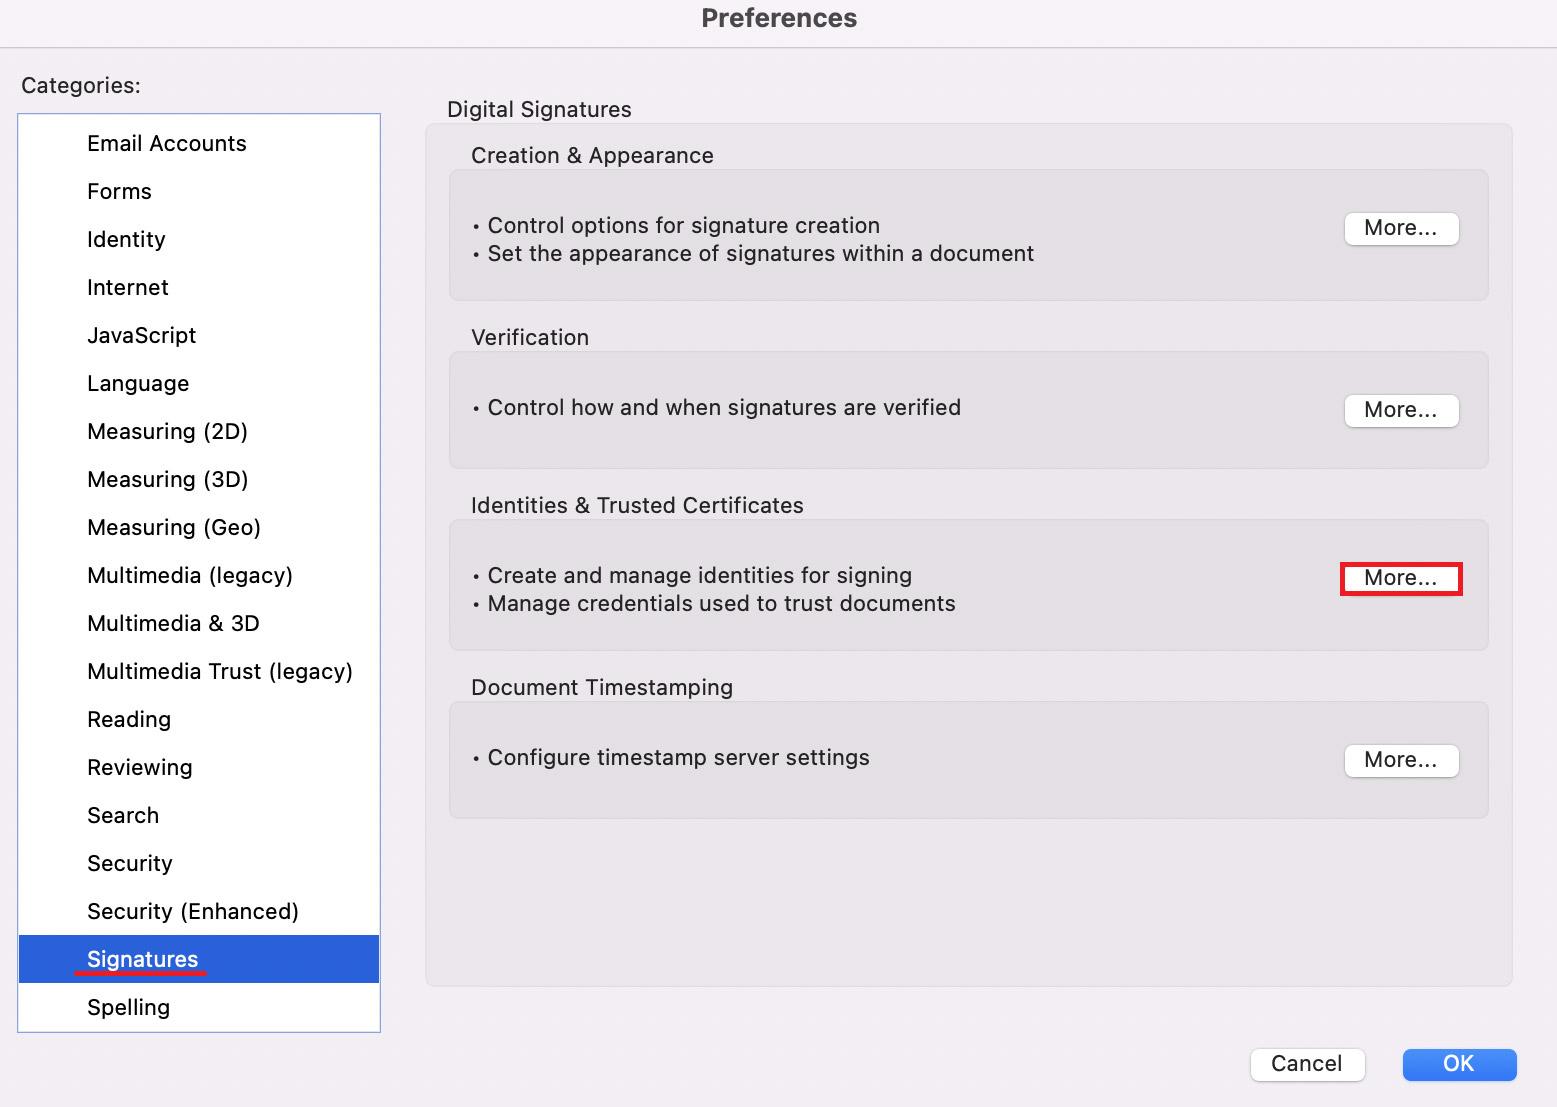
3. From the Signatures category select More for Identities & Trusted certificates.
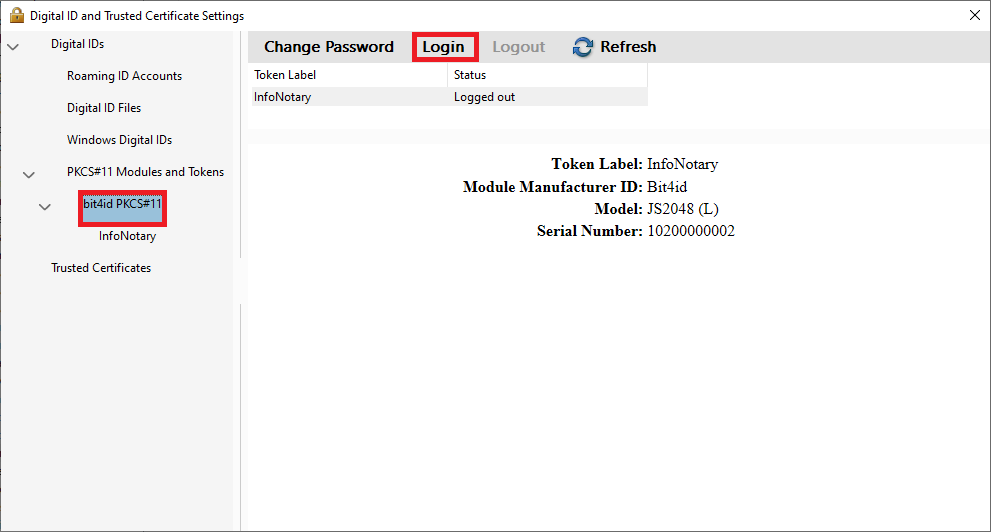
4. From Digital IDs select PKCS#11 Modules and Tokens.
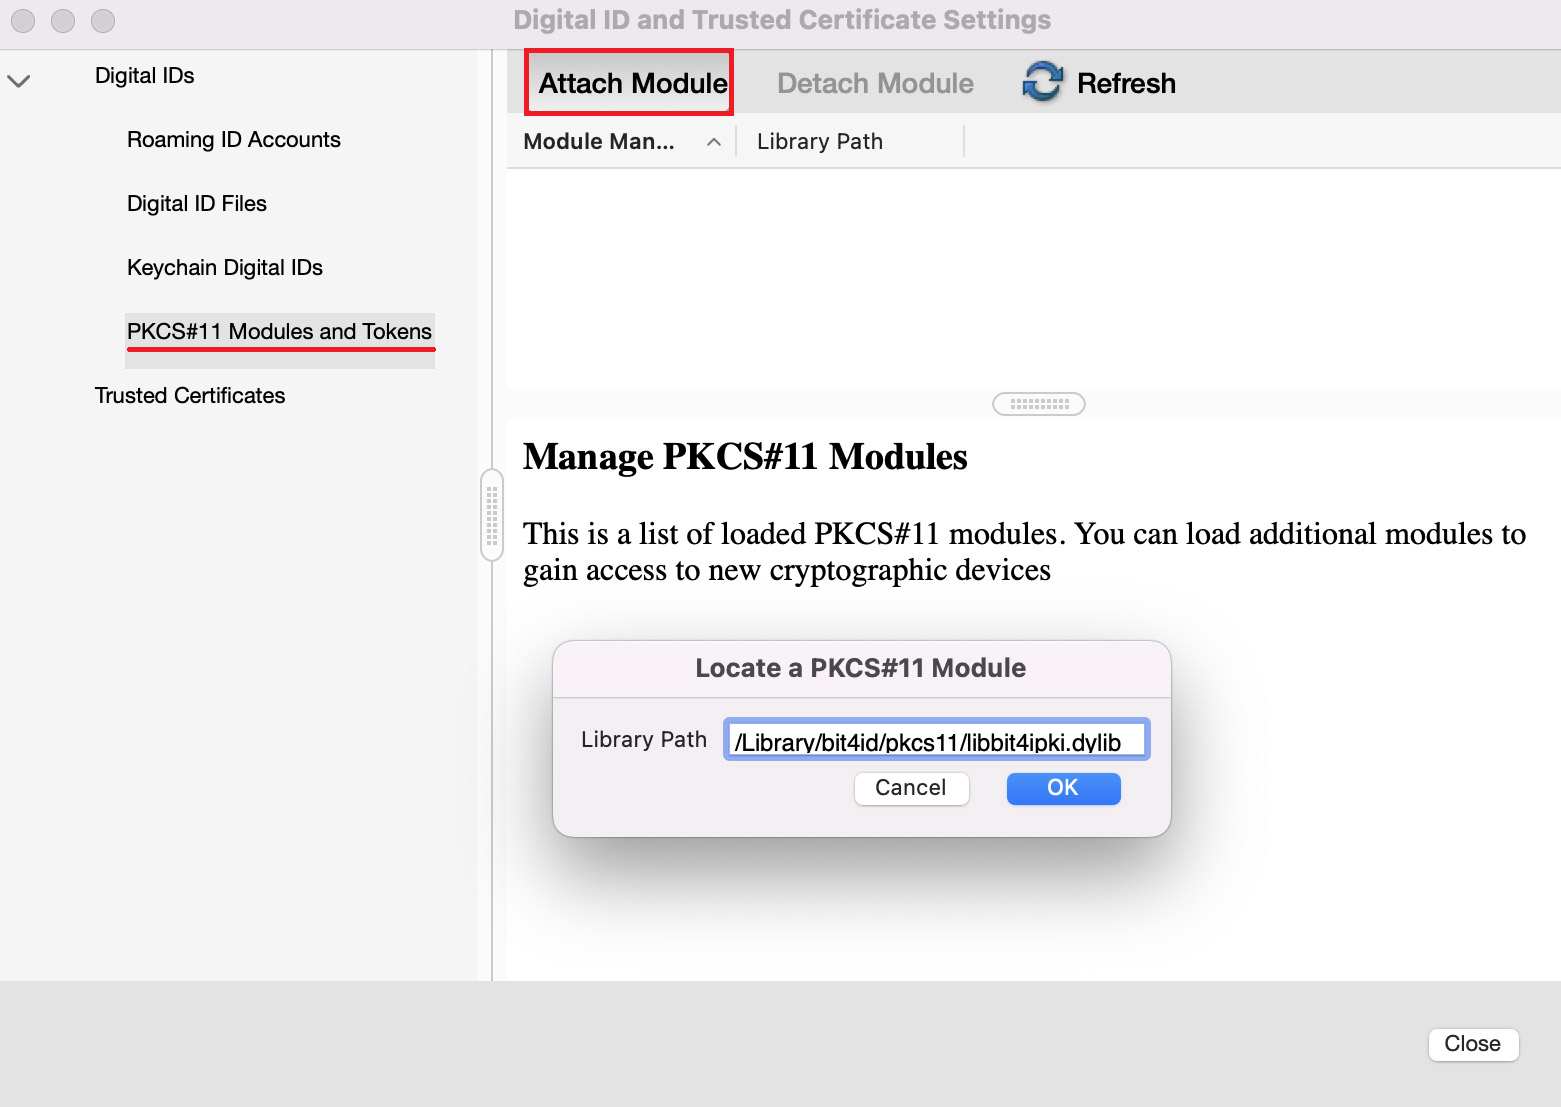
Choose Attach Module and specify the path to your smart card library.

Path to library for Windows:
IDPrime - C:\WINDOWS\system32\eTPKCS11.dll
Siemens - C:\WINDOWS\system32\siecap11.dll
Charismathics - C:\WINDOWS\system32\cmP11.dll
Bit4ID - C:\WINDOWS\system32\bit4ipki.dll
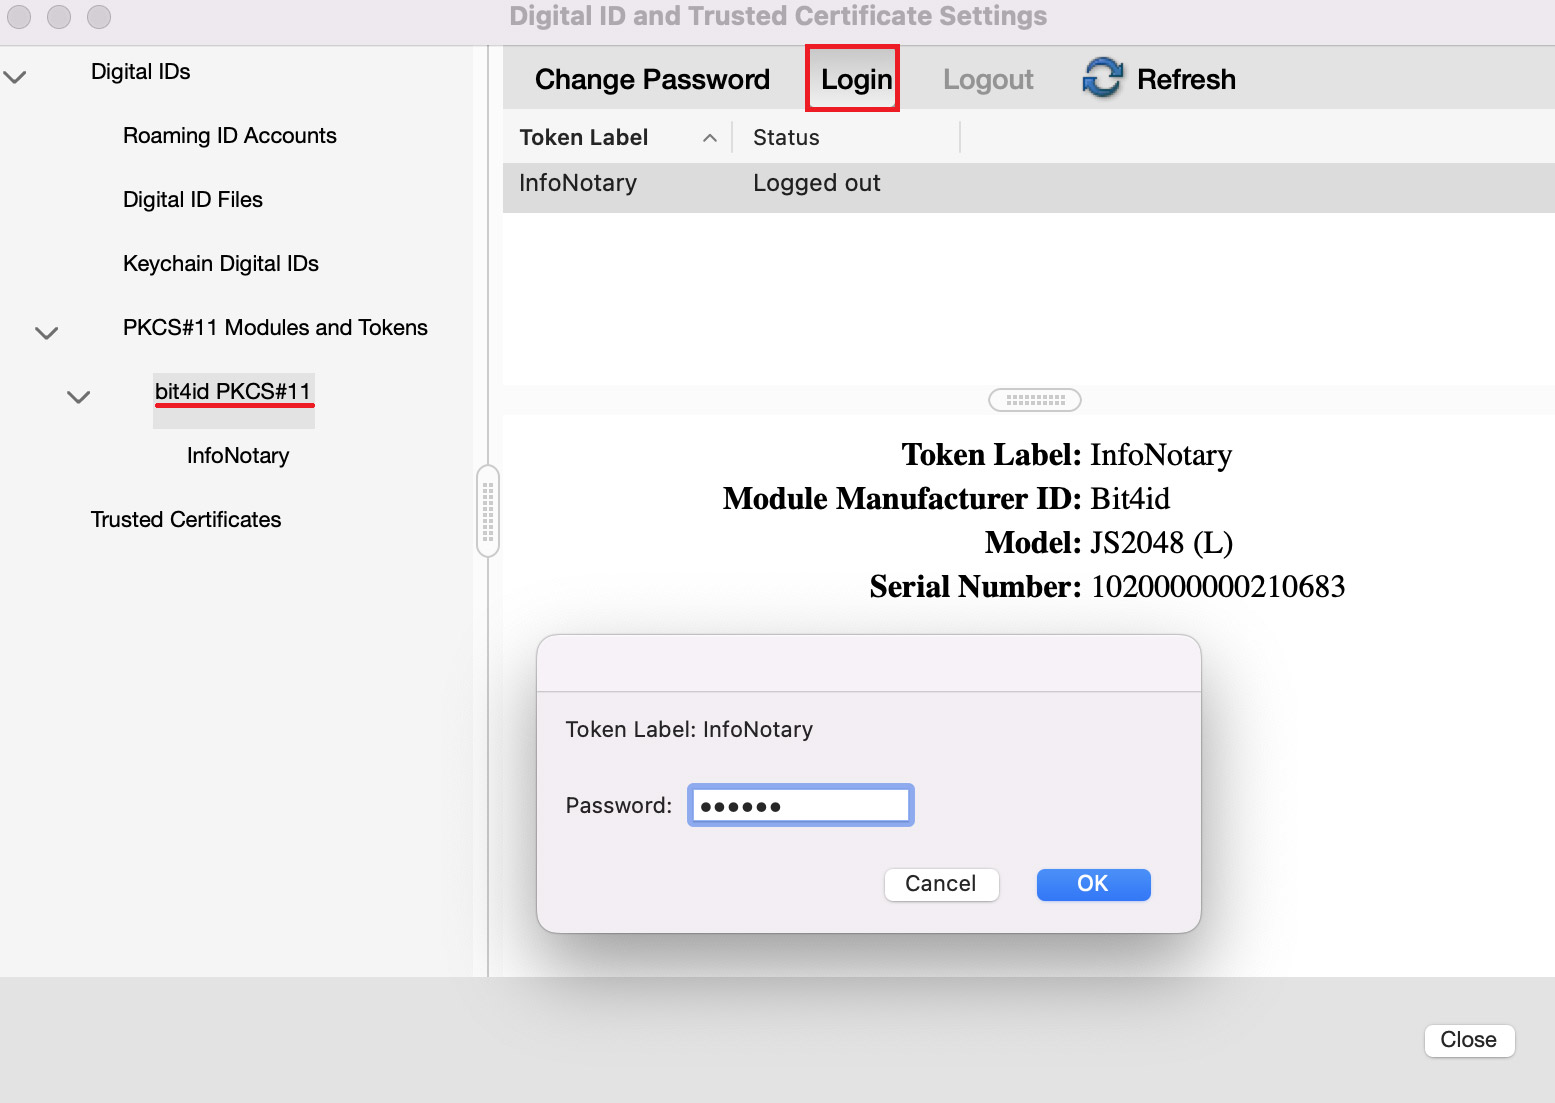
5. If set up correctly, information about your smart card will appear.
Highlight your smart card and press Login. Enter your PIN code, then attempt to sign.
Manually import in macOS
THIS SETTING IS NECESSARY ONLY IF YOUR CERTIFICATE IS NOT VISUALIZED WHEN ATTEMPTING TO SIGN OR THE PIN CODE WINDOW IS NOT SHOWING!
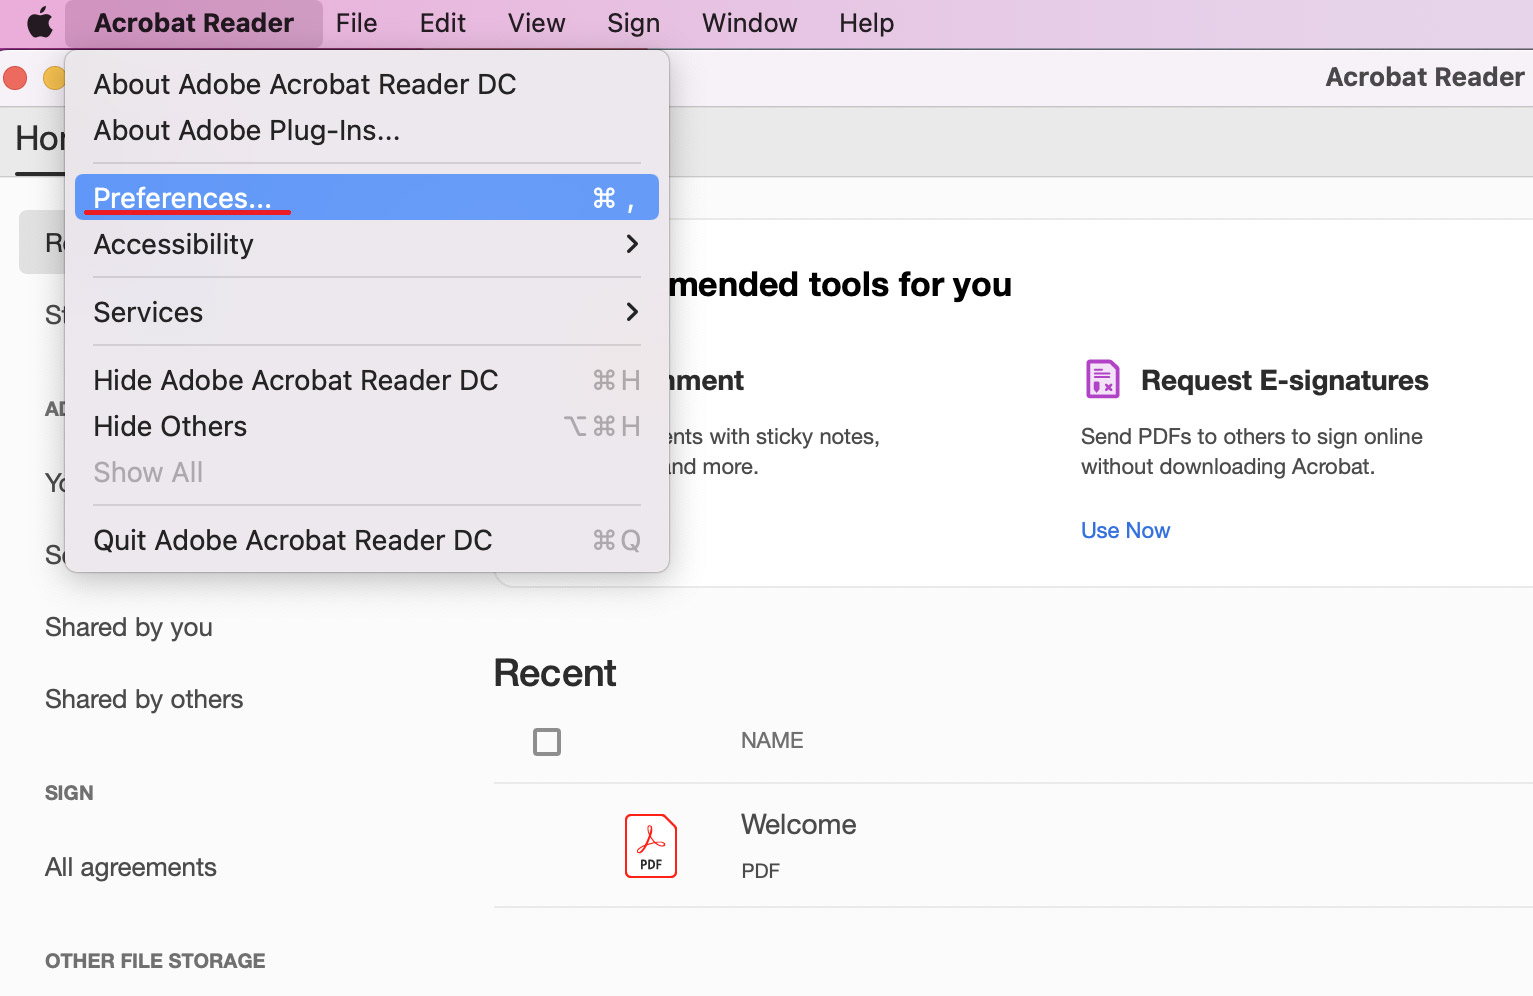
1. From menu Adobe Reader choose Preferences.
2. Choose category Signatures and click More from section Identities & Trusted certificates.
3. From Digital IDs select PKCS#11 Modules and Tokens, press the button Attach module and enter the path to the library for your smart card.
Path to library for macOS:
- IDPrime - /Library/Frameworks/eToken.framework/Versions/A/libIDPrimePKCS11.dylib
- Charismathics - /Applications/Charismathics/libcmP11.dylib
- Siemens - /Library/OpenSC/lib/opensc-pkcs11.so
- Bit4id - /Library/bit4id/pkcs11/libbit4ipki.dylib
- In case you do not know the model of your smart card, call our support to help you or use our tool for testing installation.
4. If set correctly, the model of your card will be displayed.
- Select your card and click Login. Dial your PIN to change the status to Logged in.
OmniKey CardMan

| Driver for OmniKey CardMan | |
|---|---|
| Windows 10 / Windows 11 | Download |
| Linux 32 bit | Download |
| Linux 64 bit | Download |
| macOS 10.14 - 10.15 | Download |
| macOS 11 and later versions | Download |
Latest driver versions for all operating systems can be downloaded from official site of HidGlobal - www.hidglobal.com.
If you use Linux and don't know which version to download, you can use command uname -m to check. If command output is x86_64, you must download and installl x86_64 version. If output is i386, i486, i586 or i686 you must download i686 version.
Circle CIR115
| Driver for Circle | |
|---|---|
| Windows 10 / Windows 11 | Download |
| Linux | Download |
| macOS 11 and later versions | Download |
ACS ACR38
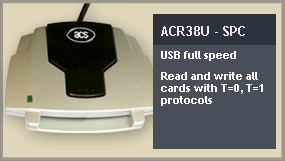
Latest driver versions for all operating systems can be downloaded from official site of ACS - www.acs.com.hk